Introduction
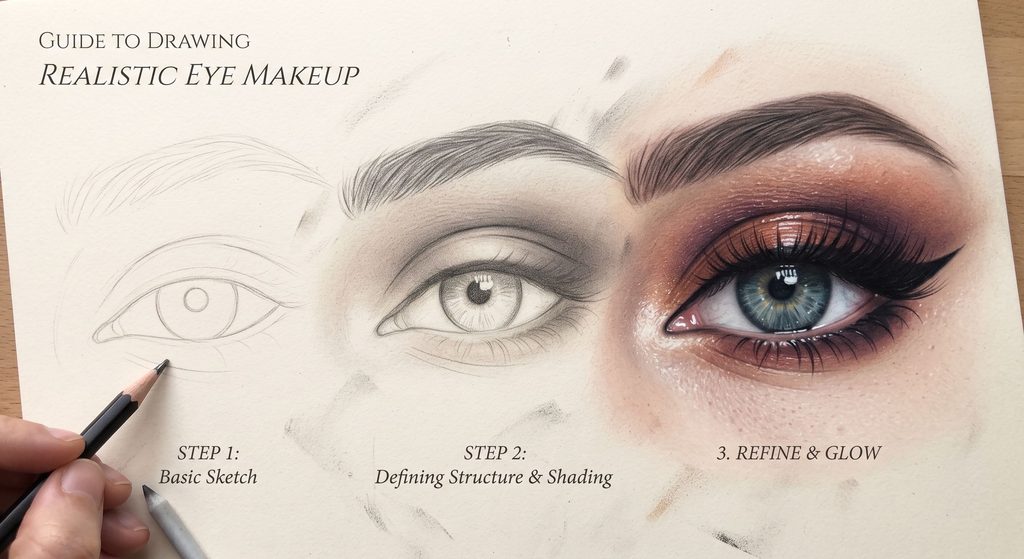
Welcome to the ultimate, beginner-friendly guide on how to draw stunning, realistic eye makeup! Whether you are an aspiring makeup artist looking to sketch out avant-garde looks, a fashion illustrator, or simply someone who loves creative sketching, mastering the art of drawing eyes with makeup is a game-changer.
Drawing eyes can feel intimidating at first. After all, the eye is often called the “window to the soul,” and capturing its glossy reflections, delicate lashes, and intricate shading requires patience. When you add makeup into the mix—like sharp winged eyeliner, velvety eyeshadow gradients, and feathered brows—the complexity seems to double. But do not worry! In this comprehensive, step-by-step guide, we will break down the entire process into simple, manageable pieces that anyone can master, regardless of your current drawing skill level.
Why Learn Eye Makeup Drawing?
Before we dive into the pencils and brushes, let’s explore why sketching eye makeup is such a rewarding pursuit:
- Boosts Your Makeup Skills: Translating makeup looks onto paper helps you understand color theory, blending, symmetry, and proportions, which translates directly to real-life makeup application.
- Sparks Creativity: You can experiment with wild, colorful, or editorial eye looks on paper that you might not wear to the grocery store.
- Improves Pencil Control: Drawing delicate details like eyelashes and eyeliner sharpens your fine motor skills and hand stability.
Let’s gather your supplies and get started!
Phase 1: Essential Tools You Need
You don’t need an expensive art studio to create a masterpiece. Here is a simple kit to get you started:
- Drawing Paper: A smooth, medium-weight sketch pad (80–100 lb) prevents tearing when you erase.
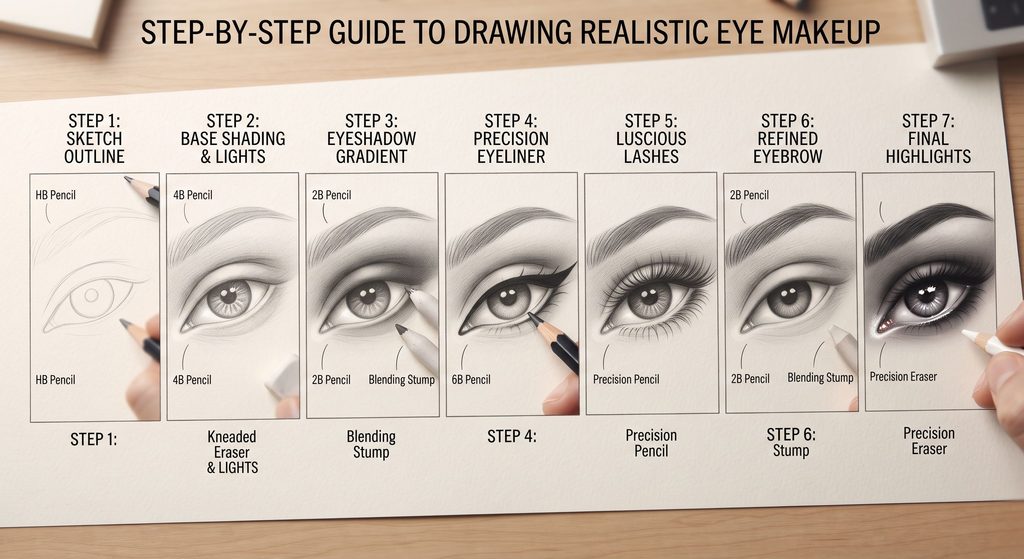
- Graphite Pencils: A range from HB (for sketching outlines), 2B (for soft shading), and 4B or 6B (for deep darks like pupils and eyeliner).
- Erasers: A standard kneaded eraser (great for lifting graphite softly) and a precision pencil eraser for cleaning up sharp lines.
- Blending Tools: A blending stump (tortillon) or cotton swabs for smooth eyeshadow gradients.
- Optional Color: Colored pencils, watercolor markers, or pastel chalks if you want to add vibrant makeup colors.
Phase 2: Understanding the Anatomy of the Eye
To draw a convincing eye, you must first understand its basic structure. An eye is not a flat oval; it is a sphere (the eyeball) set inside a bony socket, surrounded by curved eyelids that wrap around it in 3D space.
- The Eyeball: A sphere with a glossy surface that reflects light.
- The Iris and Pupil: The colored part (iris) and the dark center (pupil). Note that the pupil is always centered.
- The Eyelids: These have thickness and volume, not just flat lines. The upper lid casts a natural shadow onto the eyeball.
- The Tear Duct (Caruncle): A small, pinkish, fleshy nodule at the inner corner of the eye that gives it realism.
Step-by-Step Guide to Drawing Eye Makeup
Follow these sequential steps to bring your glamorous eye drawing to life.
Step 1: Lightly Sketch the Basic Outline
Start with an HB pencil and use very light, feathery strokes.
- Draw a gentle, slightly slanted almond shape for the eye opening.
- Remember that the highest point of the upper eyelid curve is usually slightly inner-center, not dead middle.
- Add the inner tear duct curve at the inner corner.
- Sketch the outer edge of the iris (a circle partially covered by the upper and lower lids) and the smaller pupil in the exact center.
Pro Tip: Keep your pencil strokes as light as possible. You will be erasing and refining lines frequently in these initial stages!
Step 2: Establish Shadows and Highlights (The Base)
Before adding makeup, create the underlying realism of the eye itself.
- Shade the white of the eyeball (sclera), keeping in mind that it is curved. Leave the sides slightly gray and add a bright white circular highlight where the light source hits.
- Shade the iris from the outside inward, creating a sunburst pattern with your pencil.
- Darken the pupil deeply using your 4B pencil, but make sure to leave a crisp white highlight spot untouched to give the eye a wet, living sparkle.
- Shade the upper eyelid where it folds, creating a natural shadow right above the crease.
Step 3: Lay Down the Eyeshadow Base (The Gradient)
Now the fun part begins—applying the makeup! Let’s create a classic, sultry smokey cat-eye look.
- Using your 2B pencil (or a soft makeup brush if using powder pigments), gently shade along the crease of the eyelid.
- Blend the pigment upward and outward toward the eyebrow bone. The golden rule of eyeshadow is blend, blend, blend! The color should be darkest in the crease and fade out softly as it moves upward toward the brow.
- Darken the outer corner of the eye in a “V” shape to add depth and dimension.
Step 4: Apply Precision Eyeliner
A sharp winged liner instantly elevates any eye look.
- Switch to your darkest pencil (4B or 6B) and sharpen it to a fine point.
- Draw a smooth, tapered line along the upper lash line, starting thin at the inner corner and thickening as you move outward.
- Extend the line past the outer corner, flicking it upward and outward toward the tail of the eyebrow to create a crisp wing.
- Line the outer third of the lower lash line to connect and frame the eye structure.
Step 5: Draw Luscious Lashes
Eyelashes bring the entire drawing together, adding texture and dramatic flair.
- Upper Lashes: Do not draw straight, stiff spikes. Natural eyelashes grow outward and upward in clusters, curving gently. Start thick at the base (root) and taper to a fine, sharp point. Make them longer at the outer corner for a cat-eye flutter effect.
- Lower Lashes: Draw shorter, sparser individual hairs along the lower lash line, spacing them out naturally.
Step 6: Refine the Eyebrow
No eye makeup look is complete without structured brows.
- Outline the soft, arching shape of the eyebrow above the eye.
- Draw fine, hair-like strokes moving upward at the front of the brow, and transitioning to angle downward as the brow tapers toward the tail.
- Blend lightly with a blending stump to give the brows a full, feathered, laminated appearance.
Step 7: Final Highlights and Polish
- Take your precision eraser and clean up any stray smudges around the outside of the eye.
- Enhance the specular highlights on the lower water line, the inner tear duct, and the glossy surface of the pupil to make the drawing pop off the page.
Pro Tips for Next-Level Results
- Vary Your Pencil Pressures: Heavy pressure creates dramatic dark lines, while feather-light pressure creates soft, smoky shadows.
- Pay Attention to Light Sources: Always decide where your light source is coming from (e.g., top-left) so your highlights and shadows remain consistent across the eye, lids, and lashes.
- Practice Makes Permanent: Don’t get discouraged if your first attempt looks asymmetrical. Even professional makeup artists practice sketching daily!
Conclusion
Congratulations! You have successfully walked through the complete process of drawing a glamorous, makeup-clad eye from scratch. By breaking down the anatomy, shading the eyeball, blending your eyeshadow gradients, and flicking out those perfect winged lashes, you’ve created a stunning piece of art.
Keep practicing different makeup styles—from soft nude everyday looks to dramatic neon cut-creases—and watch your artistic confidence soar.