Introduction
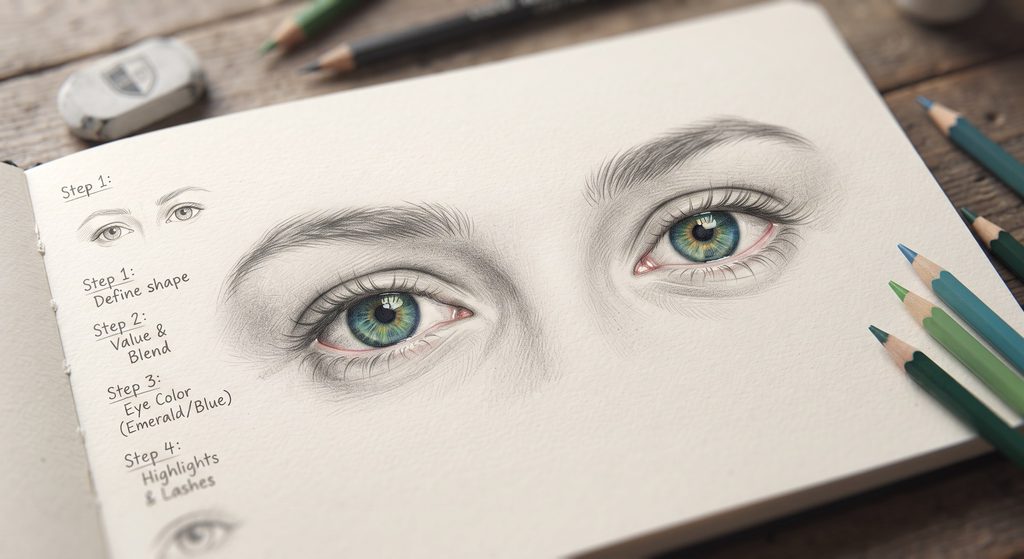
Irish eyes are world-renowned in art, poetry, and song for their striking beauty, warmth, and vibrant color—most commonly associated with captivating shades of emerald green, deep blue, or warm hazel. Capturing the essence of “Irish eyes” in a drawing isn’t just about rendering an iris; it’s about conveying a distinct brightness, soft charm, and natural elegance.
Whether you are building out your drawing portfolio, creating content for a blog like eyesdrawings.com, or simply practicing expressive facial features, this step-by-step guide will help you create a stunning, lifelike pair of Irish eyes with ease.
Why Drawing Irish Eyes is a Rewarding Art Project
When artists set out to draw realistic eyes, they often focus solely on technical accuracy—proportions, symmetry, and shading values. However, drawing “Irish eyes” invites you to go a step further by focusing on atmosphere and character.
- Emotional Resonance: Irish eyes are famously associated with a “smle” that reaches the eyes—a warmth and vitality that makes a portrait feel alive.
- Color and Contrast: Whether rendered in graphite or brought to life with rich colored pencils, the interplay of bright highlights against deep, translucent iris patterns offers fantastic practice for texture and depth.
- Skill Builder: Mastering this tutorial will improve your overall control over soft shading, symmetrical sketching, and high-contrast light placement.
Grab your sketchbook, a few trusty pencils, and an eraser. Let’s break down the process into clear, manageable steps.
Materials Needed Before You Begin
To get the best results, having the right basic tools makes all the difference:
- Drawing Paper: Smooth, medium-weight sketch paper (around 80–100 lb) that handles multiple layers of pencil without tearing.
- Pencils: A range of grades gives you flexibility. Use an HB or 2H for light guidelines, a 2B or 4B for standard shading, and a 6B for deep, dramatic darks.
- Erasers: A standard vinyl eraser for big mistakes and a kneaded eraser for lifting out soft graphite to create highlights and subtle gradients.
- Blending Tool: A blending stump or cotton swab (optional, though delicate pencil hatching often looks more natural).
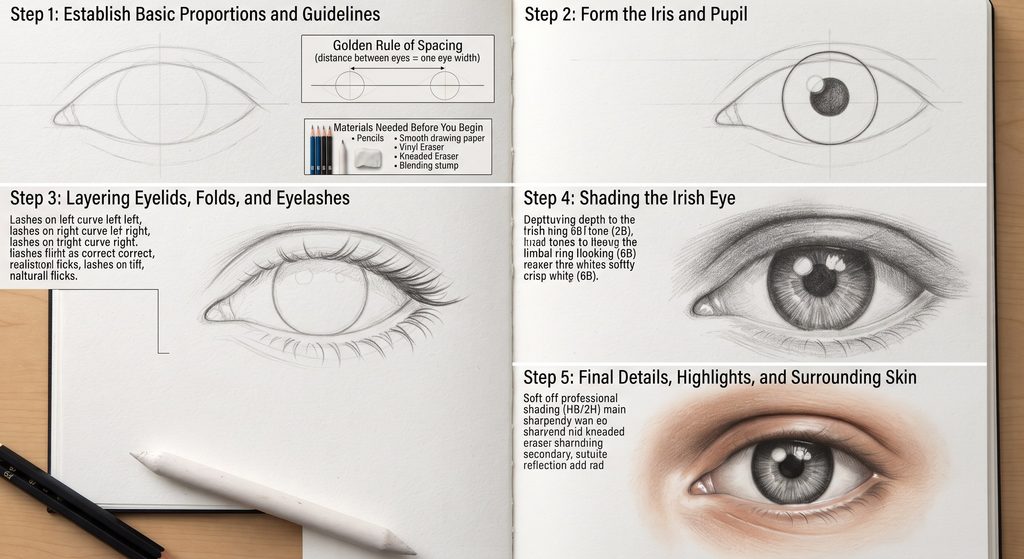
Step 1: Establish the Basic Proportions and Guidelines
Every great drawing starts with a solid foundation. If your proportions are off at this stage, the final drawing will look distorted, no matter how well you shade the iris.
Mapping the Eye Structure
Begin by holding your pencil loosely, using your whole arm rather than just your wrist. Lightly sketch a horizontal guideline across your page to ensure your eyes sit level.
- The Almond Shape: Draw a gentle almond shape. Make sure the inner corner (near the tear duct) dips slightly downward, while the outer corner lifts upward with a soft curve. This gentle slope is key to giving the eye a friendly, approachable expression.
- The Golden Rule of Spacing: If you are drawing a pair of eyes side-by-side, remember that the space between two eyes should be equal to the width of one single eye.
Pro Tip: Keep your pencil lines as faint as possible during this step. You will be erasing and refining these lines later.
Step 2: Form the Iris and Pupil
Once your outer shape is established, it is time to anchor the focal point of the piece: the iris and the pupil.
- The Center Circle: Draw a large, perfect circle centered inside the almond shape. In a natural, relaxed expression, the upper and lower edges of this circle will be slightly concealed underneath the upper and lower eyelids. If the entire circle is visible, the eye will look startled or wide-eyed.
- The Pupil: Inside the iris, draw a smaller, solid circle right in the center.
- Reserving Highlights: Before you fill the pupil in with dark graphite or ink, leave a small circular or oval area completely blank. This primary catchlight (or highlight) is what injects “life” and realism into your drawing, making the eye look glossy and reflective.
Step 3: Layering Eyelids, Folds, and Eyelashes
An eye does not float flatly on a face; it is embedded within soft tissue, skin folds, and lashes that give it a three-dimensional weight.
The Upper Eyelid Crease
Draw a soft, sweeping arched line roughly 3 to 4 millimeters above the upper eyelid. This crease line adds immense depth and defines the weight of the upper lid resting over the eyeball. Add a small, triangular tear duct shape at the inner corner.
Crafting Realistic Eyelashes
Eyelashes are one of the most common places where beginners make mistakes by drawing stiff, uniform, vertical lines like fence posts. Instead, follow these rules:
- Directional Flow: Lashes grow outward and curve away from the center. Lashes on the left side of the eye curve to the left; lashes on the right curve to the right.
- Varying Lengths: Make your strokes quick, flicking the pencil upward and outward. Layer shorter lashes underneath longer ones for a full, natural look.
- Lower Lashes: Keep the lower lash line much sparser and softer. Never draw heavy, dark lines on the bottom lid, or the eye will look heavily made up or cartoonish.
Step 4: Shading the Irish Eye (Capturing Depth and Tone)
This is where your drawing transforms from a flat outline into a striking piece of art. Whether you envision these as the legendary green eyes of the Irish countryside or a deep, stormy ocean blue, the secret lies in radiating texture and contrast.
Shading the Iris
The iris is not a flat disk; it is a complex web of fibers called stroma.
- Base Tone: Lay down a light, even layer of graphite across the entire iris (avoiding your highlight).
- Radiating Lines: Using a sharp 2B pencil, draw short, fine lines radiating outward from the pupil toward the outer edge of the iris. Vary the length and pressure of these lines to create organic texture.
- The Limbal Ring: Darken the outer perimeter of the iris with a heavier pencil (like a 4B or 6B). This dark outer border—known as the limbal ring—is crucial for making the eye pop and look crisp.
- Shadows from Above: Remember that the upper eyelid casts a natural shadow downward onto the top portion of the iris. Shade the upper third of the iris significantly darker than the lower half.
Shading the Sclera (The Whites of the Eyes)
Never leave the “whites” of the eyes pure, bright white. In reality, the eyeball is a sphere, and the eyelids cast shadows over it.
- Gently shade the corners (sides) of the eye and the top edge directly beneath the upper eyelid using a light HB or 2H pencil.
- Blend these tones smoothly to create the illusion of a round, 3D sphere resting inside a socket.
Step 5: Final Details, Highlights, and Surrounding Skin
To finish your Irish eyes drawing with professional polish, focus on the surrounding skin and final contrast adjustments.
- Skin Shading: Add soft, smooth shading around the tear duct, under the brow bone, and beneath the lower eyelid. This anchors the eye into the structure of a human face.
- Boosting Highlights: Take a kneaded eraser (molded into a sharp point) or a white gel pen to punch up the brightness of your main highlight and add a secondary, softer reflection on the opposite side of the iris. High contrast is what creates that signature sparkle.
- Cleanup: Erase any stray guidelines, smudge marks, or stray pencil dust around the edges to leave your artwork clean and framed.
Pro Tips to Take Your Drawing to the Next Level
If you want your artwork to stand out—whether you are sharing it on social media, building a portfolio, or publishing it on an art blog—keep these expert tips in mind:
- Embrace Imperfection: Real eyes are delightfully asymmetrical. Slight variations make your drawing look human rather than robotic.
- Control Your Values: Ensure your darkest darks (the pupil and limbal ring) are truly dark, and your lightest lights (highlights) are kept clean. This wide tonal range is the hallmark of professional drawing.
- Layer Slowly: Resist the urge to press down hard right away. Building up graphite in gradual, soft layers gives you total control over the final look.
Conclusion
Drawing Irish eyes is a wonderful exercise in patience, texture, and shading. By focusing on the gentle almond proportions, the radiating depth of the iris, and the high-contrast sparkle of the highlights, you can create a captivating piece of art that truly stands out.
Keep practicing these steps in your sketchbook, experiment with different expressions, and most importantly, enjoy the creative process. Happy drawing!
What style of eye drawing would you like to tackle next? Let us know in the comments below!