Introduction to Drawing Swollen Eyes
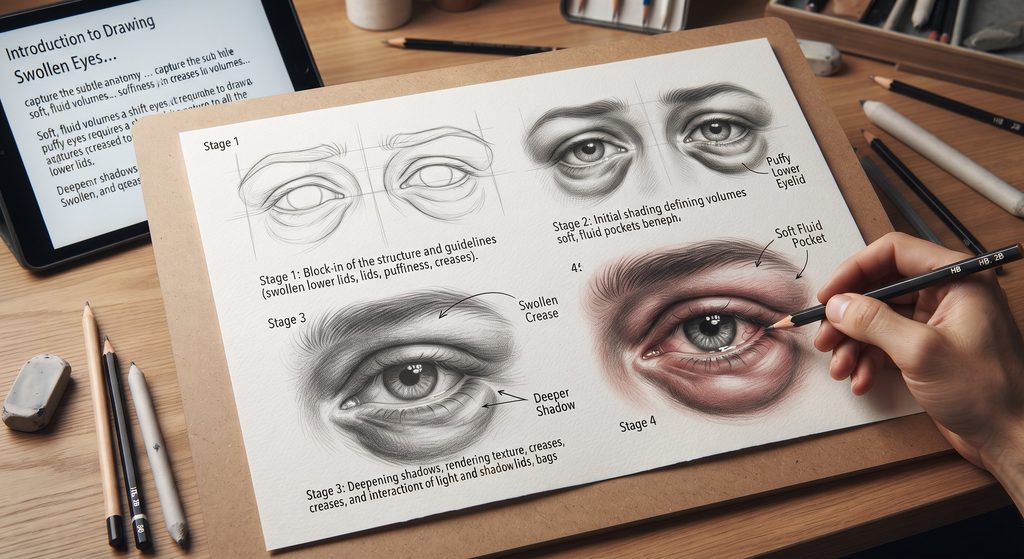
Capturing the subtle anatomy of swollen or puffy eyes is an engaging challenge that adds deep emotional realism to your artwork. Whether you are illustrating fatigue, crying, or a medical condition, mastering puffy eyes requires a shift from drawing sharp, clean contours to focusing on soft, fluid volumes. Swelling alters how light and shadow interact around the orbital bone, creating unique soft-edged creases, translucent fluid pockets beneath the lower lids, and gentle skin folds.
This step-by-step guide will walk you through the essential anatomy and techniques needed to render realistic swollen and puffy eyes with confidence.
1. Understanding the Anatomy of Swelling
Before putting pencil to paper, it is essential to understand what happens anatomically when an eye becomes swollen or puffy. Fluid retention and inflammation alter the periorbital tissue surrounding the eye socket, creating distinct visual characteristics:
- Lower Lid Pouching: Fluid frequently collects directly beneath the lower eyelid, forming a soft, pillow-like mound that partially obscures the tear trough.
- Softened Upper Crease: The double eyelid crease or upper eyelid fold often swells upward, creating a heavy, hooded appearance that casts a diffuse shadow over the eyeball.
- Narrowed Palpebral Fissure: Because the surrounding skin is distended, the visible opening of the eye appears smaller and more restricted.
- Redness and Irritation Cues: Subtle shifts in contrast around the lash line and tear duct can imply soreness, fatigue, or recent tears.
2. Essential Tools and Materials
Having the right drawing supplies makes blending skin textures and achieving smooth tonal gradients much easier:
- Graphite Pencils: A range of hardness is necessary. Use an HB for light outlining, a 2B and 4B for midtones, and a 6B or 8B for deep shadow accents.
- Drawing Paper: A smooth or fine-grain Bristol paper or heavy drawing sketch paper (100+ GSM) allows for seamless blending.
- Blending Tools: A tortillon (paper stump), a soft makeup brush, or tightly rolled tissue for smoothing skin textures.
- Erasers: A kneaded eraser (great for lifting graphite softly and creating highlights) and a precision mechanical eraser for sharp cleanup.
3. Step-by-Step Drawing Guide
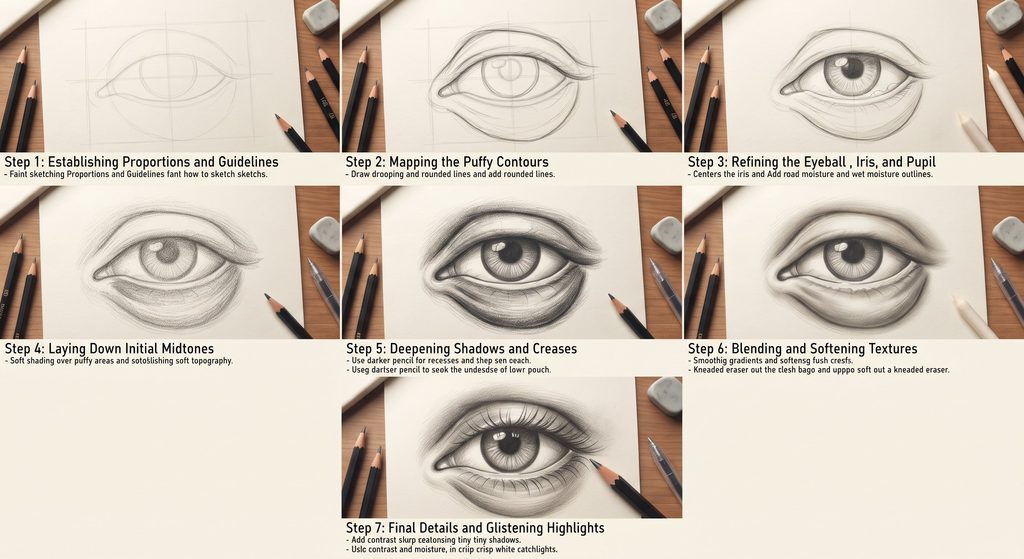
Step 1: Establishing Proportions and Guidelines
Begin with a very light HB pencil sketch. Draw a faint horizontal guideline and a vertical centerline to balance both eyes. Map out the basic oval shapes of the eyeballs and the outer boundaries of the orbital bones. Remember that even with swelling, the fundamental geometry of the human skull remains your underlying anchor.
Step 2: Mapping the Puffy Contours
Sketch the modified contours of the eyelids. Instead of a clean, sharp arch for the upper lid, draw a heavier, slightly drooping line that sags downward over the upper portion of the iris. For the lower lid, draw a sweeping, rounded curve that dips lower than normal, representing the fluid-filled bag resting above the cheekbone. Keep these initial lines loose and sketch-like.
Step 3: Refining the Eyeball, Iris, and Pupil
Inside the swollen frame, draw the visible portion of the eyeball. Often, the upper and lower portions of the iris will be partially concealed by the puffy lids. Carefully center the circular iris and the dark pupil. Add a preliminary outline for the wet, glistening waterline along the edge of the eyelids, as moisture plays a vital role in realism.
Step 4: Laying Down Initial Midtones
Using your 2B pencil, softly shade the areas experiencing the most volume change—specifically the under-eye bags and the heavy upper lid folds. Use circular or hatching motions rather than harsh strokes. The goal is to establish a midtone base that represents the gentle, rounded topography of swollen skin.
Step 5: Deepening Shadows and Creases
Switch to your 4B pencil to darken the deepest recesses: the crease of the upper eyelid, the inner corner of the eye (tear duct), and the underside of the lower lid pouch where it meets the cheek. These dark accents create the illusion of depth, making the puffy areas appear as though they are pushing forward toward the viewer.
Step 6: Blending and Softening Textures
Take your tortillon or a clean makeup brush and gently blend the graphite transitions on the skin. Swollen skin rarely has hard edges; it is characterized by smooth, pillow-like gradients. Soften your pencil strokes until the skin looks taut yet fleshy. Use your kneaded eraser to lift out soft highlights along the crest of the lower bag and the highest point of the upper eyelid arch.
Step 7: Final Details and Glistening Highlights
In the final stage, use a sharpened 6B pencil to add sharp contrast details: the delicate eyelashes casting tiny shadows onto the skin, the dark margin of the pupil, and crisp, bright white highlights in the eye reflection using a gel pen or precision eraser. These sparkling highlights contrast sharply with the dull, heavy skin, bringing the drawing to life.
Pro Tips for Maximum Realism
- Avoid Outlines: Real skin does not have black outlines. Let values (lights and darks) define the boundaries of the puffiness rather than heavy lines.
- Observe Directional Lighting: Determine where your light source is coming from (e.g., top-left). The top curve of the puffy lower lid will catch the light, while its underside will drop into shadow.
- Layer Gradually: Build your shadows slowly by adding multiple light layers of graphite rather than pressing down hard all at once.