Introduction
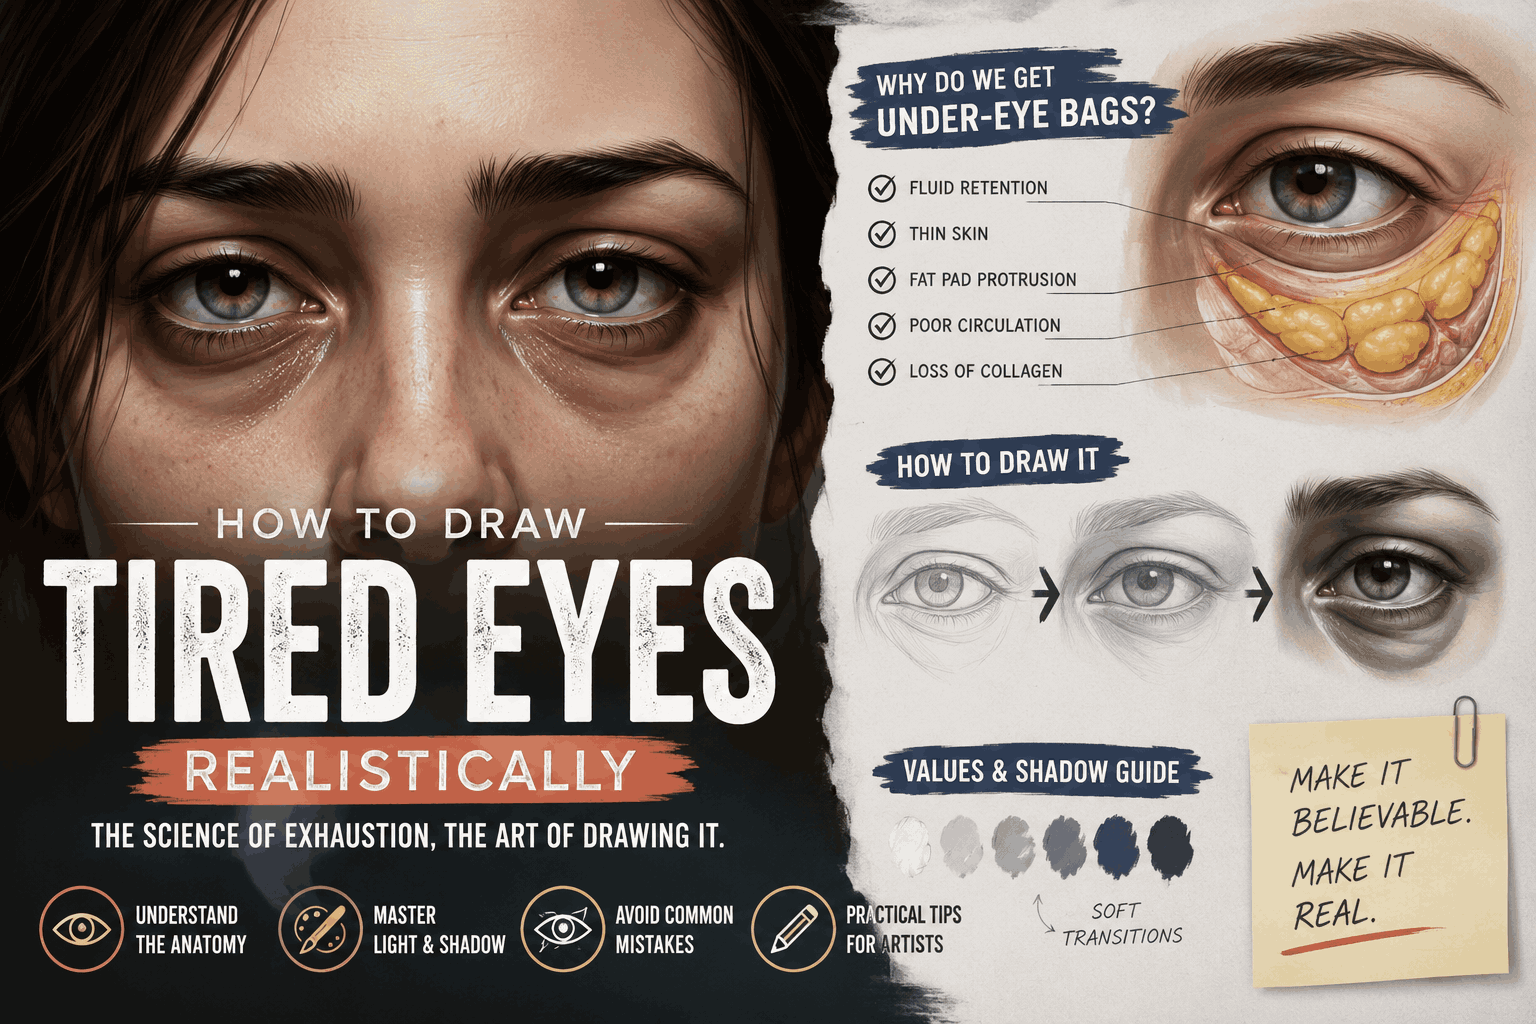
We have all looked in the mirror after a sleepless night and locked eyes with a pair of stubborn, shadowed under-eye bags. They are the universal badge of exhaustion, stress, and time. But have you ever tried to capture that exact look on paper or digital canvas, only to find your drawing looks more like a bruised eye or an unnatural smudge than realistic fatigue?
Rendering tired eyes convincingly requires a dual approach: understanding the medical and biological reasons why human eyes actually look tired, and translating that anatomy into artistic values of light, shadow, and volume. Whether you are illustrating a weary character for a comic or trying to improve your portraiture skills, mastering the under-eye area is a game-changer. Let’s dive into the science of exhaustion and the art of putting it on paper.
Part 1: The Biology – Why Do Real Eyes Look Tired?
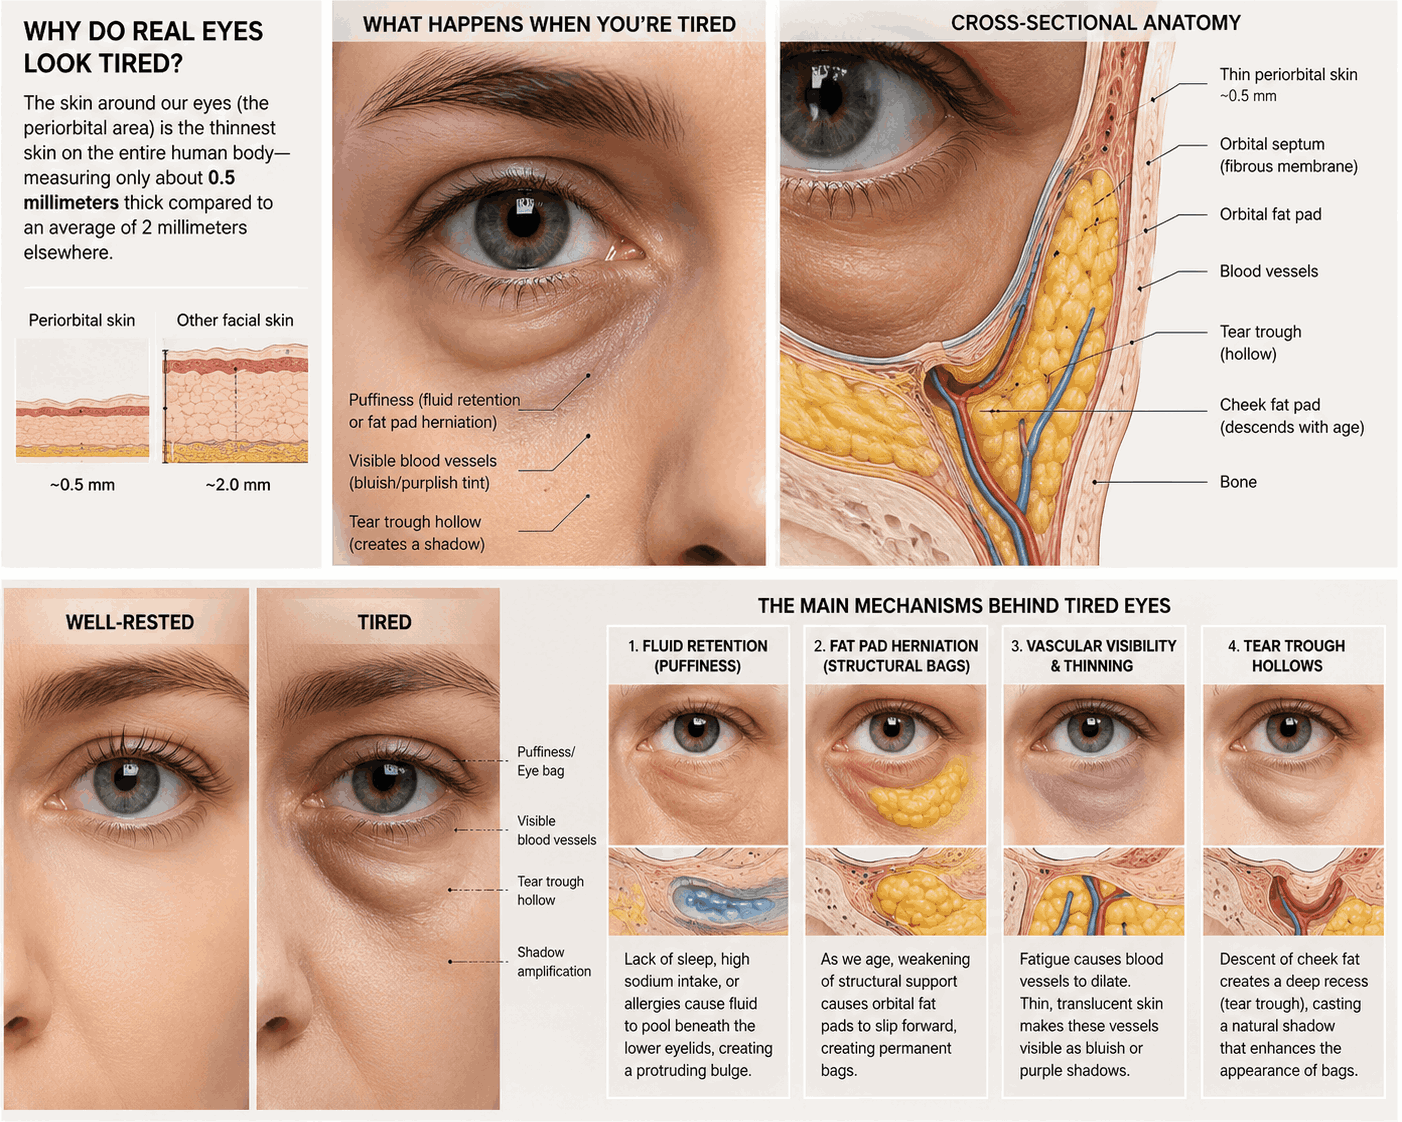
To draw something realistically, you first have to understand what is happening beneath the skin. The skin around our eyes (the periorbital area) is the thinnest skin on the entire human body—measuring only about 0.5 millimeters thick compared to an average of 2 millimeters elsewhere.
When a person looks “tired,” several biological mechanisms occur simultaneously:
- Fluid Retention (Puffiness): Lack of sleep, high sodium intake, or allergies can cause fluid to pool beneath the lower eyelids. Because the skin is so thin, this fluid creates a distinct, protruding bulge or “bag.”
- Fat Pad Herniation: As we age, the structural support and collagen holding the orbital fat pads in place weaken. These fat pads slip forward, creating permanent structural bags beneath the eyes.
- Vascular Visibility and Thinning: Fatigue causes blood vessels to dilate. Because the skin is translucent, these expanded capillaries show through as bluish or purple shadows.
- Tear Trough Hollows: Shadows are often amplified not because something is protruding, but because the cheek fat descends, creating a deep recess (the tear trough) that casts a natural shadow right below the eye bag.
Part 2: The Anatomy of Under-Eye Bags in Art
One of the most common mistakes beginner artists make is treating under-eye bags as flat, dark crescent moons drawn with a soft pencil. In reality, under-eye bags have volume.
In artistic terms, a tired eye is a masterclass in plane changes:
- The Lower Eyelid: The firm rim framing the bottom of the eyeball.
- The Bulge (The Highlight): The protruding fat pad or fluid pocket that catches the primary light source from above.
- The Transition Groove (The Core Shadow): The dip beneath the bulge where the surface turns away from the light.
- The Cast Shadow: The dark shadow thrown by the protruding bag onto the cheekbone structure.
By recognizing that an eye bag is a 3D hill followed by a valley, you shift your drawing strategy from coloring a dark spot to sculpting form with light and shadow.
Part 3: Step-by-Step Guide to Drawing Realistic Under-Eye Bags
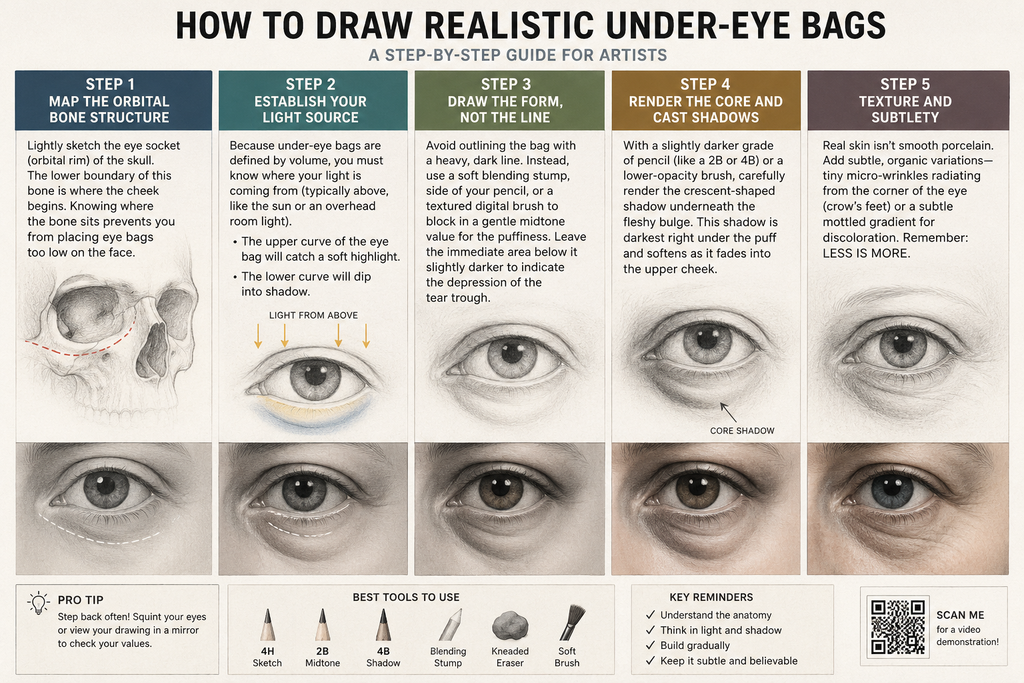
Grab your preferred drawing medium—whether graphite, charcoal, or a digital stylus—and let’s break down the rendering process step-by-step.
Step 1: Map the Orbital Bone Structure
Never draw eyes floating in isolation. Lightly sketch the eye socket (the orbital rim) of the skull. The lower boundary of this bone is where the cheek begins. Knowing where the bone sits prevents you from placing eye bags too low on the face.
Step 2: Establish Your Light Source
Because under-eye bags are defined by volume, you must know where your light is coming from (typically above, like the sun or an overhead room light).
- The upper curve of the eye bag will catch a soft highlight.
- The lower curve will dip into shadow.
Step 3: Draw the Form, Not the Line
Avoid outlining the bag with a heavy, dark line. Instead, use a soft blending stump, side of your pencil, or a textured digital brush to block in a gentle midtone value for the puffiness. Leave the immediate area below it slightly darker to indicate the depression of the tear trough.
Step 4: Render the Core and Cast Shadows
With a slightly darker grade of pencil (like a 2B or 4B) or a lower-opacity brush, carefully render the crescent-shaped shadow underneath the fleshy bulge. This shadow is darkest right under the puff and softens as it fades into the upper cheek.
Step 5: Texture and Subtlety
Real skin isn’t smooth porcelain. Add subtle, organic variations—tiny micro-wrinkles radiating from the corner of the eye (crow’s feet) or a subtle mottled gradient for discoloration. Remember: less is more. Over-rendering under-eyes will instantly age your subject far beyond looking “tired” into looking skeletal or heavily caricatured.
Part 4: Common Mistakes to Avoid
- The Raccoon Effect: Coloring the entire lower orbital area a uniform dark grey. This looks like a black eye rather than fatigue. Always remember the interplay of light on the raised puff.
- Ignoring Perspective: Eye bags wrap around a spherical eyeball resting inside a bony socket. Ensure your values curve naturally with the form of the face, rather than drawing flat horizontal stripes.
- Neglecting the Inner Corner: Tiredness often shows most intensely in the lacrimal (inner) corner of the eye, where skin is thinnest and shadows pool deeply near the bridge of the nose.
Conclusion
Capturing exhaustion in art is less about copying a formula and more about understanding human anatomy and the physics of light. By treating under-eye bags as three-dimensional forms with highlights, midtones, and cast shadows rather than simple dark smudges, your portraits will instantly gain depth, emotion, and realism. The next time you feel tired, take a look in the mirror—your best reference model is staring right back at you.
Suggested Related Clickable Articles
To keep readers engaged on your website and lower your bounce rate, link these related articles within your blog post:
- [Mastering Portrait Lighting: How Light Sources Dictate Facial Volume and Mood]
- [Anatomy for Artists: How to Draw Realistic Eyes from Every Angle]
- [The Psychology of Facial Expressions: Drawing Emotion Beyond the Eyes]
- [Digital Painting Skin Textures: From Smooth Porcelain to Realistic Pores]