


When you look in the mirror after a long night, you see them: the shadows, the slight puffiness, the gentle sagging beneath your lower eyelids. They are an everyday human reality. But when it comes to translating that exact human quality onto paper or canvas, many artists hit a brick wall.
Why do some portraits look flat and lifeless, while others practically breathe? The secret lies in understanding what causes bags under eyes drawing challenges in the first place—both in human anatomy and in the mechanics of artistic rendering.
If you want to master the art of drawing realistic fatigue, aging, and emotion, you need to look past the symbols we draw as children and examine how light, shadow, and bone structure actually interact around the eye socket.
1. Anatomy Basics: What Actually Causes Bags Under the Eyes?
Before your pencil ever touches the paper, you have to understand the biological architecture of the eye. Without this foundation, shading is just guesswork.
The eye sits inside a bony cavity called the orbit. Beneath the eye, several anatomical factors create what we perceive as “bags” or shadows:
- Fat Protrusion: As we age, or due to genetics, the orbital fat that cushions the eyeball can shift forward, herniating through the retaining ligament and creating a visible pouch.
- Fluid Retention (Puffiness): Lack of sleep, high sodium intake, or allergies cause fluid to pool in the loose, paper-thin skin of the lower eyelid overnight.
- The Tear Trough (Hollows): Often, what looks like a “bag” is actually a shadow cast by a deep depression running from the inner corner of the eye down across the cheekbone. This is known as the tear trough or nasojugal groove.
- Thin Skin and Vascular Show: The skin under the eye is the thinnest on the entire human body (roughly 0.5 millimeters). Beneath it sit tiny blood vessels. When these dilate or show through, they create dark circles that often accompany bags.
Translating Biology to Art
In drawing, you aren’t rendering “bags” as standalone shapes; you are rendering light hitting protruding volumes and shadows settling into recessed cavities. The bag is a raised shelf of flesh, and the dark circle is a shadow or a thin, translucent skin layer revealing the hollow beneath.
2. The Psychology of the Eye: Why We Look Tired
As artists, we draw to evoke emotion. Bags under the eyes are one of our most powerful visual storytelling tools. They instantly communicate:
- Exhaustion and Burnout: Heavy, drooping upper lids paired with swollen lower pouches.
- Aging and Wisdom: Fine lines, crepey skin texture, and deeper tear troughs that tell a life story.
- Melancholy or Illness: Sunken eyes surrounded by soft, muted bruised tones.
When you draw bags under the eyes, you are tapping into viewer empathy. If you draw them too harshly, your subject looks like a cartoon zombie. If you draw them too softly, the emotion is lost. Precision is everything.
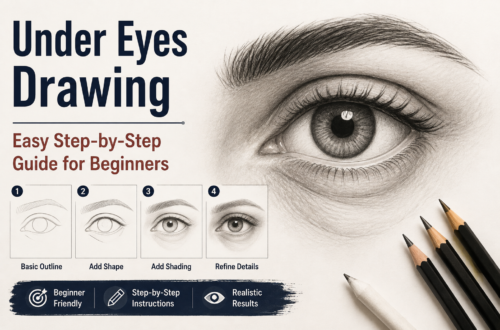
3. Step-by-Step Guide: How to Draw Under-Eye Bags Realistically
Let’s break down the technical process of rendering under-eye bags without making your subject look ancient, bruised, or accidentally sketched.
Step 1: Establish the Skull Structure First
Never start shading the lower lid in isolation. Always map out:
- The sphere of the eyeball.
- The hard edge of the orbital bone (the cheekbone and the bridge of the nose).
- The upper and lower eyelid curves wrapping around the sphere.
Step 2: Locate the Tear Trough and Pouch Boundaries
Lightly map the boundary lines using an H or 2H pencil.
- Draw the lower lash line.
- Move down about 2 to 4 millimeters (depending on age) to map the lower edge of the “bag.” This is usually a gentle, swooping curve that starts near the tear duct and fades out as it approaches the outer corner of the eye.
- Mark the dark crescent of the tear trough running diagonally downward toward the nose.
Step 3: Layer Your Values (The Shading Process)
Under-eye bags are characterized by soft gradients, not hard outlines.
- The Highlight (The Ridge): The top edge of the bag—the part protruding outward toward the light source—stays the lightest. Keep this area clean or lightly blended.
- The Mid-Tone (The Volume): The main body of the pouch catches ambient light. Use a B or 2B pencil to shade this softly, maintaining a smooth gradient.
- The Core Shadow (The Crease): Just beneath the pouch, where the skin dips into the tear trough, lies the darkest shadow. Use a 4B or 6B pencil here, but keep the edges feathered. A hard shadow here will look like a severe scar or a harsh wrinkle rather than a natural swelling.
Step 4: Add Skin Texture (Subtlety is Key)
Skin under the eye is not smooth like glass; it has microscopic folds.
- Use a sharp pencil to add faint, broken cross-hatching or stippling for older subjects.
- For younger, tired subjects, rely purely on smooth value transitions rather than visible lines. Over-rendering wrinkles on a young face instantly adds 30 years.
4. Common Mistakes Artists Make When Drawing Tired Eyes
Even intermediate and advanced artists fall into these common traps:
- Outlining the Bag Like a Cartoon: Drawing a hard, dark ring completely around the eye makes it look like goggles or a mask. In reality, the bottom of the bag merges softly into the cheek.
- Ignoring the Light Source: Shadows must match your overall lighting scheme. If light comes from the top left, the underside of the bag will cast a shadow, but the top ridge will glow.
- Making the Eyes Look Dirty Instead of Shadowed: Heavy-handed smudging with a blending stump creates mud. Build values with controlled pencil strokes before smoothing.
5. Summary: Master the Volume, Control the Shadow
When exploring what causes bags under eyes drawing challenges, remember that it all comes down to volumetric rendering. You are drawing a 3D pillow of flesh resting on a skull. By balancing the highlighted ridge, the soft mid-tone of the pouch, and the deep recess of the tear trough, you can bring incredible realism, depth, and emotional resonance to your character art.
Grab your sketchbook, observe real human faces under different lighting conditions, and start practicing the subtle gradients that bring portraits to life.