Introduction
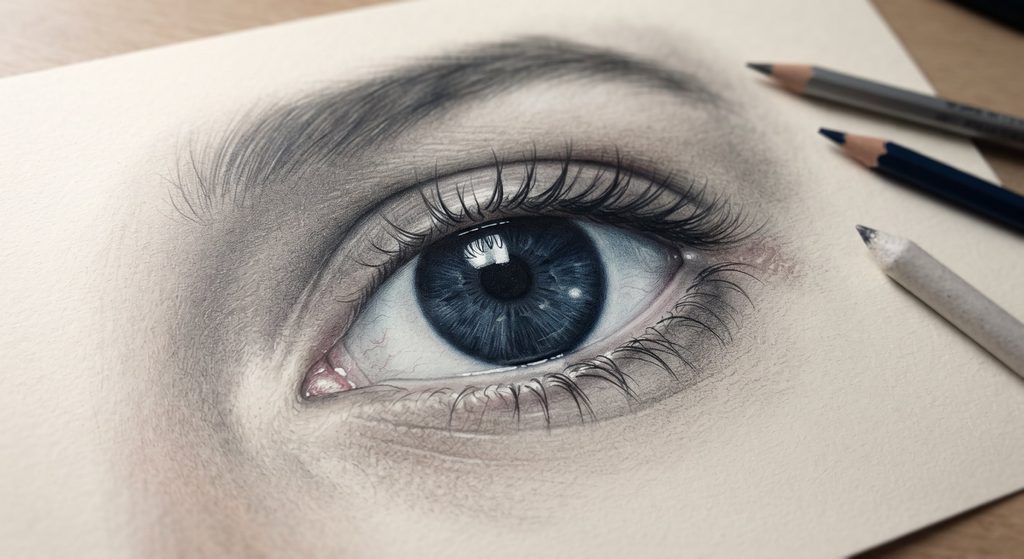
Capturing the captivating depth and striking color of dark blue eyes on paper is a rewarding challenge for artists of all levels. Unlike light sky-blue eyes, dark blue eyes carry rich, moody undertones—often blending navy, indigo, charcoal, and subtle hints of teal or slate. Getting them right requires a careful balance of contrast, sharp highlights, and smooth gradient blending.
In this step-by-step outline, you will learn how to build realism from the ground up, starting from basic anatomical proportions to the final luminous highlights that bring the eye to life.
1. Understanding the Anatomy of a Realistic Eye
Before putting pencil to paper, understanding basic eye anatomy is the secret weapon that separates flat, cartoonish drawings from striking, photorealistic art. An eye is not a flat shape on a face; it is a spherical ball set within a dynamic, fleshy socket.
The Spherical Form of the Eyeball
The visible white of the eye (the sclera) is a sphere. This means light and shadow must curve across it. If you shade the sclera as a flat white surface with harsh black corners, the eye will look like a cutout. Instead, treat it like a 3D globe wrapped in eyelids.
The Iris and Pupil Dynamics
- The Pupil: Located in the center, the pupil expands and contracts depending on light. For a standard neutral portrait, keep it circular and pitch-black—though leaving a tiny bounce-light at its base adds instant realism.
- The Limbal Ring: This is the dark, blurry outer boundary where the iris meets the sclera. A crisp yet slightly softened limbal ring gives the eye youth, definition, and depth.
- The Trabeculae (Iris Fibers): The iris is packed with fine, radial striations that stretch from the pupil outward. In dark blue eyes, these fibers weave together complex networks of navy, indigo, and slate gray.
2. Essential Materials and Tools
To achieve rich, vibrant dark blue tones and velvety smooth blends, having the right tools makes all the difference.
- Drawing Paper: A smooth or semi-smooth surface (like Bristol Vellum or heavy-weight 120+ GSM sketching paper) works best for colored pencils and graphite blending.
- Pencils / Mediums:
- Graphite Pencils (2H, HB, 2B, 6B): For mapping initial proportions and deep shadow mapping.
- Colored Pencils: A rich palette featuring White, Sky Blue, Cobalt/Medium Blue, Dark Indigo, Prussian Blue, Burnt Umber (for subtle warmth), and Black.
- Blending Tools: A blending stump (tortillon) or cotton swab for soft graphite transitions, and a kneaded eraser for lifting highlights.
- Highlights: A white gel pen (like a Posca or Signo) for crisp, intense corneal reflections.
3. Step-by-Step Tutorial: How to Draw Realistic Dark Blue Eyes
Let’s dive into the core drawing process, broken down into sequential phases to guarantee success.
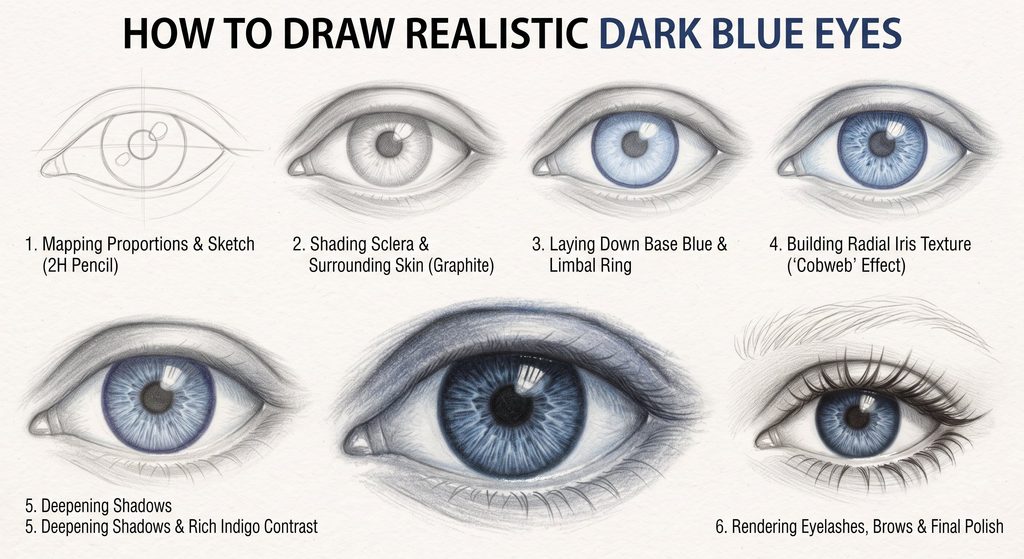
Step 1: Mapping Proportions and the Initial Sketch
Begin with a light 2H graphite pencil so your guidelines can be easily erased or blended later.
- The Almond Shape: Lightly sketch a symmetrical almond shape, slightly tilted downward at the inner corner and sweeping gracefully upward.
- The Iris Placement: Draw a circle for the iris. Remember that the upper and lower eyelids naturally clip the top and bottom of the iris; it should rarely be a complete, floating circle unless the subject is wide-eyed in shock.
- The Pupil and Highlights: Draw the pupil precisely in the center. Lightly circle the areas where your primary light source will hit (usually one large rectangle or circle near the top edge overlapping both the pupil and iris).
Step 2: Shading the Sclera and Surrounding Skin
Before touching the blue pencils, establish the surrounding values.
- Sclera Shading: Shade the corners of the sclera using light cool gray. Deepen the upper portion where the eyelid casts a natural shadow downward onto the eyeball.
- Eyelid Thickness: Draw the double line of the upper eyelid to show its physical thickness. The underside of this upper lid should be dark, as it casts a shadow directly onto the top of the eyeball.
- Skin Folds and Sockets: Softly shade the upper crease and the orbital bone area above it. Add a gentle shadow beneath the lower lid to give the eye weight and structure.
Step 3: Laying Down the Base Blue Tones
Now, introduce color.
- First Layer: Using a soft light blue pencil, gently shade the entire iris while completely avoiding your reserved white highlight spots. Use very light pressure.
- Defining the Limbal Ring: Take your dark indigo or Prussian blue pencil and firmly trace the outer perimeter of the iris to establish a bold, rich limbal ring.
Step 4: Building the Radial Iris Texture (The “Cobweb” Effect)
Dark blue eyes derive their depth from complex overlapping layers.
- Drawing Fibers: Using medium blue and indigo pencils sharpened to a fine point, flick short, delicate lines outward from the pupil toward the limbal ring. Vary your line length and pressure.
- Adding Undertones: Introduce subtle hints of deep slate gray or a touch of dark teal in patches between the fibers to mimic natural eye pigmentation variations.
Step 5: Deepening Shadows and Rich Indigo Contrast
To make the blue pop, you need maximum contrast.
- Darkening the Pupil and Core: Press firmly with your darkest indigo and black pencils right around the pupil border and the outer edges of the iris, blending them inward into the radial lines.
- Smooth Layering: Use a colorless blender pencil or a soft-layered burnishing technique (pressing medium-hard with a light blue over dark layers) to create a glossy, wet, enamel-like finish across the iris.
Step 6: Rendering Eyelashes, Eyebrows, and Final Polish
The final details tie the entire drawing together.
- Drawing Eyelashes: Upper eyelashes grow outward and downward before sweeping up in a dramatic curve. Do not draw straight, stiff spikes; taper your strokes, making them thicker at the base and razor-thin at the tip. Make them overlap naturally.
- Lower Lashes: Lower lashes are sparser and finer. Draw them sparingly, casting delicate shadows onto the skin below.
- The Final Highlights: Take your white gel pen or white charcoal pencil and refresh your primary specular highlights. A sharp, brilliant white reflection on a dark blue iris instantly creates the illusion of moisture and life.
4. Pro Tips for Hyper-Realistic Dark Blue Eyes
- Avoid Pure Black Everywhere: While dark blue eyes are deep, completely flat black can kill the luminous quality of the blue. Always mix deep indigo and Prussian blue with your black for richer depth.
- Mind the Reflection Shape: The shape of your white highlight dictates the environment. A curved rectangular highlight mimics a window or studio softbox, adding instant professional polish to your portrait.
- Patience with Layering: Build color gradually. Realistic textures require 3 to 5 translucent layers of colored pencil rather than one heavy-handed application.
Conclusion
Drawing realistic dark blue eyes is a journey of patience, contrast, and careful layering. By respecting the spherical anatomy of the eyeball, building rich indigo and navy textures, and preserving crisp, glowing highlights, you can transform a simple sketch into a breathtaking piece of art.
Grab your pencils, take your time with each phase, and watch as those striking dark blue eyes come alive on your page!