Introduction
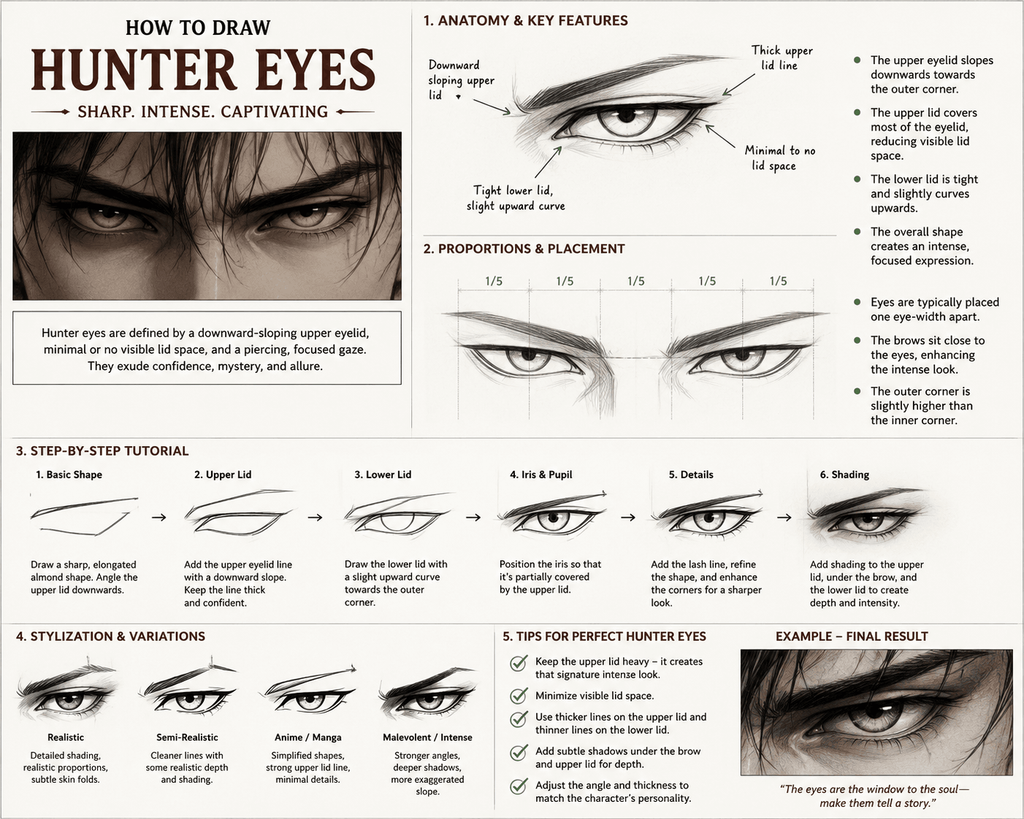
The striking appeal of sharp, intense gaze lines has made hunter eyes drawing a massive trend among digital artists, sketchers, and anime enthusiasts alike. Characterized by a downward-sloping upper eyelid, minimal to zero visible lid space, and an intense, focused expression, hunter eyes convey confidence, mystery, and allure. Whether you are illustrating an original character or capturing the fierce gaze of your favorite fictional archetype, mastering this eye shape adds incredible depth and realism to your art. This comprehensive guide will walk you through the essential anatomy, proportions, and step-by-step techniques required to render compelling hunter eyes that instantly captivate your audience.
1. Understanding Hunter Eye Anatomy & Proportions
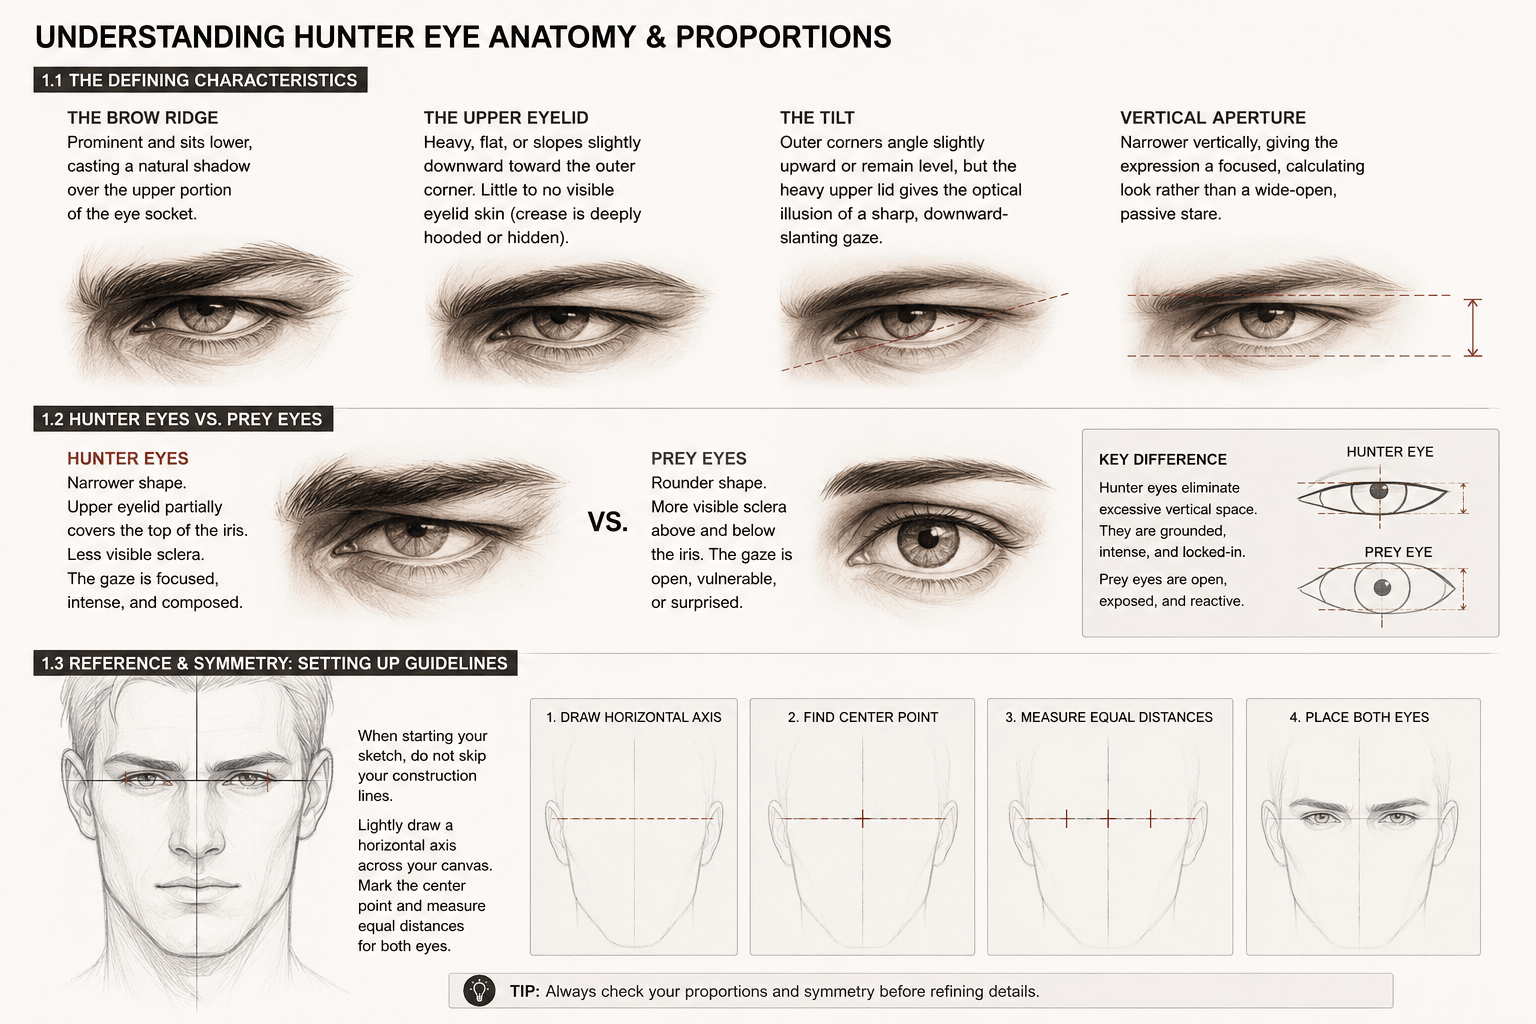
Before putting pencil to paper or stylus to tablet, it is crucial to understand what physically defines hunter eyes. Great artists don’t just copy reference images; they understand the underlying structure that creates the visual effect.
1.1 The Defining Characteristics
- The Brow Ridge: In a hunter eye structure, the brow bone is typically prominent and sits lower, casting a natural shadow over the upper portion of the eye socket. This adds to the intense, hooded appearance.
- The Upper Eyelid: Unlike rounder eyes where the upper lid curves high above the iris, the upper lid in hunter eyes is heavy, flat, or slopes slightly downward toward the outer corner. Crucially, there is little to no visible eyelid skin (the crease is deeply hooded or hidden).
- The Tilt: The outer corners of the eyes often angle slightly upward or remain level, but the heavy upper lid gives the optical illusion of a sharp, downward-slanting gaze that locks onto a target.
- Vertical Aperture: The overall shape is narrower vertically, giving the expression a focused, calculating look rather than a wide-open, passive stare.
1.2 Hunter Eyes vs. Prey Eyes
To truly master the technique, contrast is key. “Prey eyes” are typically characterized by a rounder shape, visible white space (sclera) above or below the iris, and a higher arched brow line, which naturally communicates openness, vulnerability, or surprise. In contrast, “hunter eyes” eliminate that excessive vertical space. The upper eyelid partially covers the top of the iris, grounding the gaze and making the character look locked-in, focused, and completely composed.
1.3 Reference & Symmetry: Setting Up Guidelines
When starting your sketch, do not skip your construction lines. Lightly draw a horizontal axis across your canvas. Mark the center point and measure equal distances for both eyes—remember that the space between two human eyes is typically equal to the width of one eye. Establish a light vertical anchor for the tear ducts so that both eyes align perfectly before you start carving out those sharp, angular lids.
2. Step-by-Step Drawing Tutorial
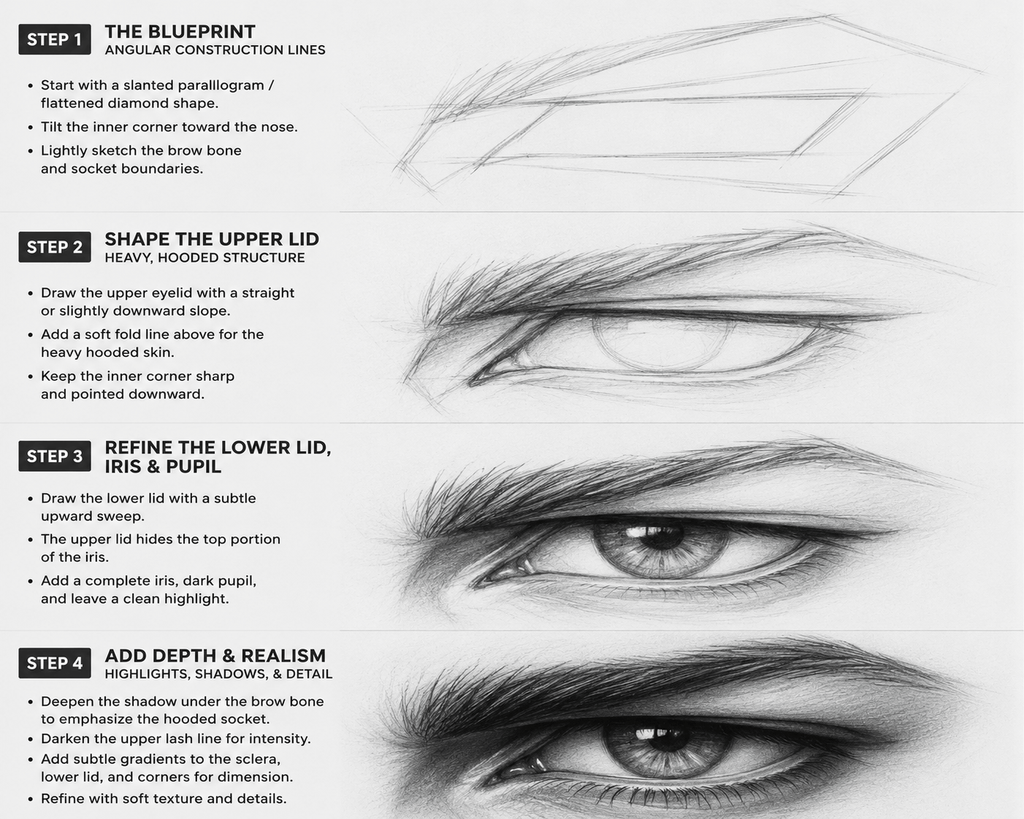
Let’s break down the process into four manageable, highly effective steps. Grab your sketchbook or fire up your digital art software, and let’s build the gaze from the ground up.
Step 1: The Initial Blueprint and Angular Construction Lines
Begin with an HB pencil or a soft sketching brush at low opacity. Instead of drawing curved ovals, start with sharp, angular geometric lines.
- Lightly sketch a slanted parallelogram or a flattened diamond shape that tilts slightly toward the nose at the inner corner.
- Outline where the heavy brow bone will cast its shadow. Keep your lines very faint so they can be easily modified or erased later. At this stage, you are merely mapping out the boundaries of the socket and the general orientation of the gaze.
Step 2: Shaping the Heavy, Hooded Upper Eyelid
This is where the magic of the hunter eye takes shape.
- Draw the upper eyelid line. Ensure it is relatively straight or follows a slight downward slope toward the outer edge.
- Because this is a hooded structure, draw a second soft fold line just above the main eyelid line to represent the heavy skin fold overlapping the eye. Avoid showing too much eyelid skin; keep the space tight and compact.
- Ensure the inner corner (the epicanthic fold or tear duct area) points sharply downward, creating a hooked or falcon-like sharpness.
Step 3: Refining the Lower Lid, Iris, and Pupil
Now, focus on the lower half of the eye structure.
- The lower eyelid should be relatively straight or sweep up gently to meet the outer corner, cutting off the bottom of the iris slightly if you want an even more intense, narrowed expression.
- Draw a complete circle for the iris, but remember that the upper third to quarter of the iris must be hidden beneath the heavy upper eyelid. This overlap is the secret ingredient that gives hunter eyes their signature hypnotic intensity.
- Place a sharp, dark pupil right in the center and leave space for a clean, crisp light highlight (specular reflection) to bring the eye to life.
Step 4: Adding Highlights, Shadows, and Depth
Flat lines only go so far; value and shading create realism and volume.
- Shade the upper socket deeply underneath the brow bone. This emphasizes the hooded nature of the eye and makes the eyeball look recessed.
- Darken the upper lash line significantly. A thick, dark upper lash line anchors the heavy lid and intensifies the gaze.
- Add subtle gradients along the lower lid and the outer corners of the sclera to give the eye a spherical, 3-dimensional form rather than a flat drawing on paper.
3. Stylistic Variations: Realism vs. Anime & Manhwa
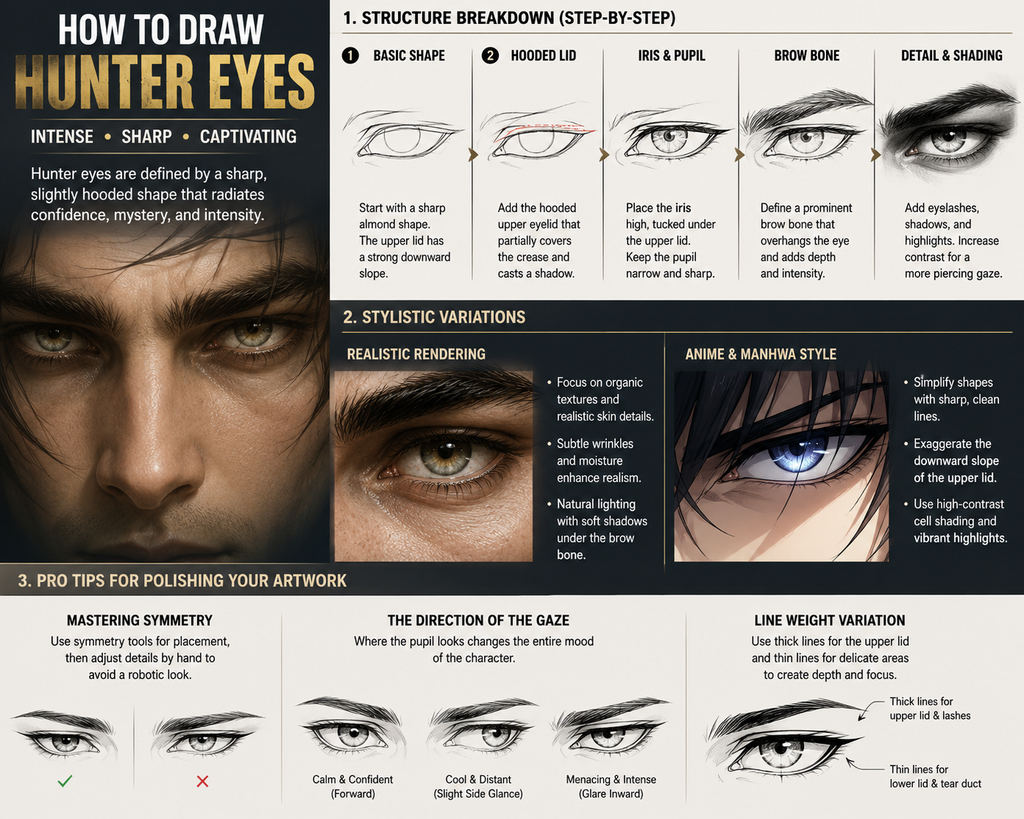
Depending on your artistic niche, hunter eyes can be rendered in vastly different art styles. Here is how to adapt the technique:
3.1 Realistic Rendering
In realism, focus heavily on organic textures. Skin isn’t smooth plastic; incorporate subtle wrinkles around the outer corners (crow’s feet for older characters), realistic moisture lines along the waterline, soft pinks and grays in the tear duct, and delicate iris fibers radiating outward from the pupil. The lighting should reflect real-world physics, with a primary light source casting realistic shadows from the brow bone directly onto the upper lid.
3.2 Anime & Manhwa Style
Anime and webtoon artists love hunter eyes because they instantly signal a badass, cool, or cunning protagonist/antagonist (think characters like Levi Ackerman or Gojo Satoru in certain frames). To achieve this style:
- Simplify the geometry into sharp, clean vector lines or bold ink strokes.
- Exaggerate the downward slope of the upper eyelid and make the iris narrower and sharper.
- Use high-contrast cell shading: crisp shadows under the bangs and brow, paired with vibrant, glowing iris highlights to make the gaze pierce through the panel.
4. Pro Tips for Polishing Your Artwork
- Mastering Symmetry: Drawing two matching fierce eyes can be tricky. If you are working digitally, use a symmetry tool to get the placement right, then slightly offset minor details or hand-adjust them so the expression doesn’t look unnaturally robotic.
- The Direction of the Gaze: Even if the eye shape is correct, where the pupil looks changes everything. For a calm, confident hunter look, have the character gaze straight ahead or slightly to the side. For a menacing look, have the pupils glare toward the inner corners (squinting slightly).
- Line Weight Variation: Use thin, delicate lines for the inner tear duct and lower lid, but use thick, bold lines for the upper eyelid and eyelashes. This natural variation mimics real lighting and adds professional polish to your illustration.
Conclusion
Mastering a hunter eyes drawing opens up a whole new level of expression in your character art. By focusing on a prominent brow bone, a heavy hooded upper eyelid, a tightly framed iris, and sharp angular lines, you can instantly inject confidence, mystery, and intensity into any portrait. Grab your sketchbook, practice these structural steps daily, and watch your character illustrations transform with a powerful new gaze!