Capturing the human gaze is one of the most rewarding challenges an artist can face. The old saying goes that “eyes are the window to the soul,” and in portraiture, they are undoubtedly the focal point. If the eyes look flat, misplaced, or lifeless, the entire portrait loses its impact. Conversely, when you get the eyes right, the entire drawing springs to life.
Whether you are working with graphite, charcoal, or digital mediums, rendering a realistic eye requires moving past what you think an eye looks like and focusing entirely on what you actually see. This comprehensive guide breaks down the anatomy, structural mechanics, and shading techniques needed to master realistic eyes.
Anatomy of a Realistic Eye
Before putting pencil to paper, you must understand the underlying structure. Many beginners draw the eye as a simple two-dimensional football shape, which immediately kills realism. In reality, the eye is a sphere nestled inside a bony socket, covered by wraps of skin (the eyelids).
   [ Brow Ridge ]
     \
      ( Upper Eyelid )
     /                \
[ Tear Duct ] --- ( Iris / Pupil ) --- [ Outer Corner ]
     \                /
      ( Lower Eyelid )
1. The Sclera (The Eyeball)
Often called the “white of the eye,” the sclera is rarely pure white. Because it is a sphere, it is subject to shadows cast by the eyelids and the curvature of the skull. Treating it as a flat white shape makes the eye look cartoonish.
2. The Iris and Pupil
The iris is a circular, muscular structure that controls the amount of light entering the pupil. It features intricate, radiating patterns of fibers. The pupil is simply a hole in the center of the iris that absorbs light, making it the darkest value in your drawing.
3. The Eyelids and Thickness
Eyelids are not flat lines; they have distinct thickness. Both the upper and lower eyelids have a continuous wet rim (the waterline) where the eyelashes actually grow. Failing to draw this rim is one of the most common reasons an eye drawing looks “off.”
4. The Caruncle (Tear Duct)
Located at the inner corner of the eye, this small, pinkish nodule has a unique, wet texture. It creates a soft transition between the eyeball and the bridge of the nose.
Step-by-Step Tutorial: Drawing a Realistic Eye
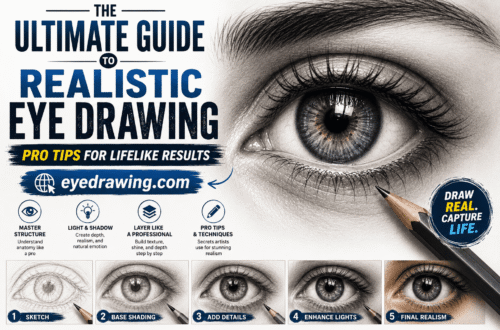
Let’s walk through the exact structural process of drawing an eye from a straight-on perspective using standard graphite pencils (ranging from 2H for light lines to 6B for deep shadows).
Step 1: The Structural Mapping
Start with a light touch using a hard pencil (like a 2H). Sketch the overall shape of the eye, keeping in mind that it is an organic, asymmetrical form. The outer corner is typically slightly higher than the inner tear duct.
Draw the iris as a perfect circle. Even if the upper and lower sections are covered by the eyelids, map out the entire circle first to ensure its geometry remains accurate. Place the pupil exactly in the center.
Step 2: Establish the Eyelid Thickness
Draw a secondary line just inside the lower eyelid and outside the upper eyelid. This creates the “waterline” or thickness of the lids. At this stage, map out your highlights—the bright reflections of light on the wet surface of the eye. Lightly outline these shapes so you know to leave them completely white later.
Step 3: Shading the Core Values
Switch to a softer pencil (HB or 2B) and fill in the pupil completely. It should be a rich, solid black. Next, shade the outer ring of the iris (the limbal ring).
Apply a soft, dark shadow directly underneath the upper eyelid. Because the upper lid projects outward over the sphere of the eyeball, it casts a distinct downward shadow onto both the sclera and the iris.
Step 4: Rendering the Iris Details
The iris behaves like a funnel or a bowl that dips inward toward the pupil. Light enters the eye, passes through the clear cornea, and illuminates the opposite side of the iris.
- Radiating Lines: Draw fine lines radiating outward from the pupil toward the edge of the iris. Vary their thickness and tone.
- Secondary Highlight: If your primary light source is coming from the top left, the bottom right side of the iris will display a soft, glowing highlight due to light refracting inside the eye.
Step 5: Adding Depth to the Sclera and Skin
Use a blending stump or a soft brush to gently shade the outer corners of the eyeball. Turn the white sphere into a 3D object by darkening the edges near the tear duct and the outer corner.
Move outward to the skin. Shade the crease of the upper eyelid deeply, and softly render the gentle puffiness or creases under the lower lid. Remember to shade the tear duct with soft, fleshy tones, leaving a tiny dot of white paper to mimic a wet reflection.
Step 6: Drawing Realistic Eyelashes
Never draw eyelashes as straight, uniform spikes pointing out like spokes on a wheel.
Eyelashes grow from the outer edge of the eyelid rim, not the waterline. They grow in overlapping clumps, curving outward and downward before flicking upward. Upper lashes curve up toward the brow, while lower lashes are shorter, thinner, and curve down toward the cheek. Use a sharp 4B or 6B pencil and apply rapid, flicking motions—pressing firmly at the root and releasing pressure at the tip to create a natural taper.
Mastering the Three Keys to Photographic Realism
Achieving a truly professional, photographic finish relies on mastering three distinct visual phenomena: contrast, three-dimensional form, and texture.
1. High Contrast and Deep Values
True realism requires courage with your dark values. Many intermediate artists are afraid to make their drawings dark enough, resulting in a hazy, gray image. The pupil, the deep shadow inside the eyelid crease, and the roots of the eyelashes should be a deep, velvety black. This strong contrast makes your highlights pop.
2. Spherical Form
Every element must respect the three-dimensional volume of the eye. When shading the skin around the eye, follow the contours of the orbital bone. When drawing the iris, remember it sits underneath a clear dome (the cornea). Shading around the edges of the eyeball creates the illusion that the eye is rolling back safely into its socket.
3. Textural Variation
Realism is a game of textures. The eye features an incredible contrast of surfaces:
- The Wet Surfaces: The cornea and the waterline are incredibly slick and reflective. They feature sharp, hard-edged highlights with maximum brightness.
- The Fleshy Surfaces: The skin of the eyelids and the surrounding brow are soft, matte, and porous. They require smooth blending, soft transitions, and subtle skin-pore texturing.
Common Mistakes to Avoid
- Keeping the Sclera Pure White: As emphasized, a flat white eyeball breaks the 3D illusion instantly. Softly shade the corners and the top edge.
- Perfectly Symmetrical Eyes: No human face is perfectly symmetrical. Avoid using a cookie-cutter template for both eyes; look closely at your reference photo for individual quirks, tilts, and shapes.
- Drawing Every Single Eyelash Separately: Eyelashes naturally cross over one another, stick together in small triangles, and vary wildly in length. Draw them in natural groupings rather than a neat row of soldiers.
- Ignoring the Eyebrow Structure: The eyebrow acts as a frame for the eye. Ensure the hairs flow in the correct direction—growing upward at the bridge of the nose, angling sideways across the middle, and tapering downward at the tail.
Conclusion
Learning to draw realistic eyes is a matter of training your brain to see shapes, values, and edges rather than symbolic concepts. By breaking the eye down into its true anatomical components, treating the eyeball as a three-dimensional sphere, and taking the time to render rich contrasts and wet textures, you will transform your portraits from simple sketches into captivating, lifelike masterpieces.
Grab your pencils, find a high-resolution reference photo, and practice sketching these components individually. With patience and deliberate practice, mastering the gaze will become second nature.