There is something deeply captivating about opening a blank sketchbook and filling a fresh page with a hyper-realistic human eye. Often called the window to the soul, the eye is the ultimate test of an artist’s grasp on proportion, value, and texture.
Whether you are an art student looking to refine your portraits or a hobbyist trying to level up your sketchbook pages, capturing life-like realism requires more than just practice. It requires knowing how to see.
This comprehensive guide breaks down the complex anatomy of the eye into manageable steps. Grab your pencils, open your sketchbook, and let’s master the art of realistic eye drawing.
1. The Essential Art Supplies You Need
Before your pencil touches the paper, you need the right tools. Drawing hyper-realism on book pages or textured sketchbook sheets requires a carefully curated set of graphite grades.
- Graphite Pencils: You will need a range of hardness. Grab a hard pencil (2H or H) for light layout lines, a medium pencil (HB or 2B) for foundational tones, and soft, dark pencils (4B, 6B, or 8B) for deep, rich shadows.
- Blending Tools: A paper stump (tortillon) is crucial for smoothing out large skin textures. Clean Q-tips work wonders for soft gradients like the sclera (white of the eye).
- Erasers: A kneaded eraser is vital because you can mold it into sharp points to pull highlights out of dark values. A mechanical or precision stick eraser (like a Mono Zero) is perfect for micro-highlights.
- The Paper: If you are sketching inside a dedicated sketchbook, look for heavy-weight paper (at least 80 lb / 130 gsm) with a smooth to medium tooth. Too much texture makes blending difficult; too little texture prevents the graphite from gripping the page.
2. Understanding the Hidden Anatomy of the Eye
The biggest mistake beginners make is treating the eye as a flat, two-dimensional almond shape. In reality, the eye is a perfect sphere nestled inside a skeletal socket, covered by curtains of skin (the eyelids).
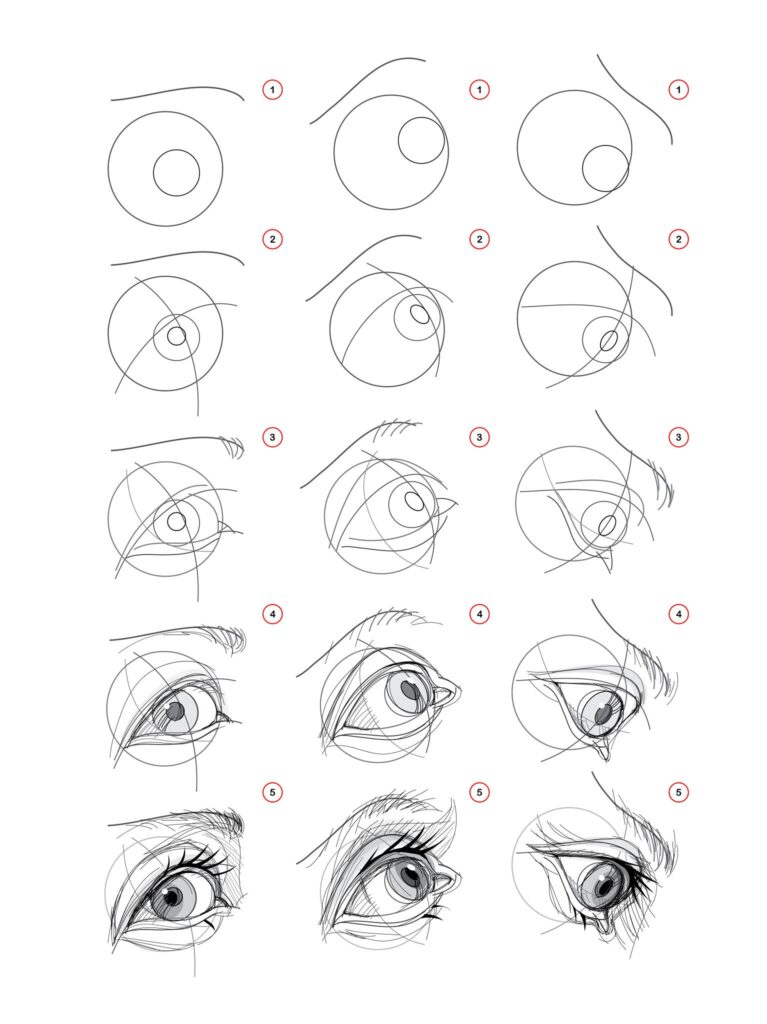
When you look at a forward-facing eye, keep these structural rules in mind:
- The Sclera is a Ball: Because the white of the eye is a sphere, shadows must curve around its edges. It is almost never pure white.
- The Iris is Flat and Recessed: The colored ring of the eye sits behind a clear, protective dome called the cornea. This means shadows cast by the upper eyelid will always fall across the top of the iris.
- The Eyelids Have Thickness: Eyelids are not lines; they are shelves of flesh wrapped around a ball. The lower lid catches light on its top edge, while the upper lid casts a shadow down onto the eyeball.
3. The Step-by-Step Drawing Process
Follow these steps in order. Remember, patience is the secret ingredient to hyper-realistic textures.
Step 1: The Linear Outline (The Under-Drawing)
Using your 2H pencil, sketch with an incredibly light touch. If you press too hard, you will score the paper, creating permanent grooves that reject graphite later.
- Draw a faint circle to establish the eyeball’s overall volume.
- Map the iris as a perfect circle inside. Unless the subject is wide-eyed with shock, the top of the iris should be slightly covered by the upper eyelid.
- Trace the sweeping curves of the upper and lower eyelids.
- Indicate the tear duct (lacrimal caruncle) at the inner corner. It resembles a small, soft triangle pointing toward the nose.
Step 2: Isolating the Highlights and Pupils
Before adding any dark values, protect your bright areas. Look at your reference photo and lightly outline the catchlight (the reflection of light sources on the wet surface of the eye).
- Draw the central pupil inside the iris. Make sure it is perfectly centered.
- Sketch your catchlight right over the boundary of the pupil and iris. Do not shade inside this shape; keeping it stark white is what gives the eye its wet, lifelike quality.
Step 3: Laying Down Darkest Values
Switch to a 4B or 6B pencil. Fill in the pupil entirely, bypassing the catchlight you isolated in Step 2. Next, darken the upper lash line. Because the upper eyelashes clump together and cast a deep shadow, this line will be one of the darkest, crispest elements of your entire sketch.
Step 4: Shading the Iris Complexities
The iris is packed with organic patterns called stroma fibers. It looks like a bicycle wheel with spokes radiating from the pupil out to the outer rim.
- Darken the outer edge of the iris (the limbal ring) with a 2B pencil.
- Draw organic, wavy lines extending outward from the pupil and inward from the limbal ring. Leave a slightly lighter ring of value between them to create depth.
- Smooth these lines out gently using a paper blending stump, then use your precision eraser to peck away tiny, bright radial lines. This contrast creates a realistic, glassy texture.
[Pupil: Solid Black] -> [Inner Iris: Dense Radial Spokes] -> [Middle Iris: Lighter Midtones] -> [Limbal Ring: Dark Crisp Border]
Step 5: Giving the Eyeball Three-Dimensional Mass
Now, address the sclera (the white of the eye). If you leave it pure white, your drawing will look flat and cartoonish.
- Using a H or HB pencil, lightly shade the far left and far right corners of the eyeball.
- Bring a soft shadow down from under the top eyelid.
- Take a clean Q-tip and softly blend these shadows toward the center, leaving only the area directly around the iris completely bright. This instantly curves the eyeball back into the eye socket.
Step 6: Shading the Eyelids and Surrounding Skin
To make the eye pop off your sketchbook page, you need realistic skin tones around it.
- The Upper Lid Fold: Use a 2B pencil to deepen the crease above the eye. Blend it upward to simulate the brow bone overhang.
- The Lower Lid Shelf: Leave the tiny rim of skin directly beneath the eyeball bare or very lightly shaded. This is the wet shelf where water collects; it catches reflections. Shade the skin below this shelf to create the lower eyelid puffiness.
- Skin Texture: Avoid blending the skin into a perfectly smooth plastic look. Use the side of an HB pencil to create subtle pore textures, and break up flat areas with your kneaded eraser to introduce natural variations.
4. Mastering Eyelashes and Final Highlights
The final details can make or break your realism. Eyelashes confuse many artists because they try to draw them like straight toothpicks sticking out of the eye.
| Feature | Growth Direction | Drawing Technique |
| Upper Eyelashes | Curve up and out like hooks | Start at the lid, flick up, swoop down slightly first |
| Lower Eyelashes | Curve down and out | Shorter, spaced further apart, grow from outer lid edge |
| Eyebrow Hairs | Follow the underlying bone | Layer individual strokes using a sharp 2B/4B |
- Eyelash Clumping: Eyelashes naturally cross over one another and gather into tiny, wet triangles. Look at your reference image and draw them in small clusters rather than perfectly spaced uniform rows.
- The Final Polish: Take your sharpest precision stick eraser and clean up your main catchlight. Add a few micro-highlights to the tear duct and along the wet lower eyelid shelf. These microscopic wet spots tie the entire drawing together, transforming pencil lead into living tissue.
5. Pro-Tips for Drawing in a Sketchbook
Drawing high-fidelity realism in a standard book or sketch pad comes with a unique set of challenges. Keep these field-tested studio tips in mind:
- Use a Slip Sheet: Graphite smudges incredibly easily. When working inside a book, always place a clean, loose sheet of paper under your drawing hand. This stops your palm from sweeping across completed work and ruining your fine details.
- Spray Fixative: Once your eye portrait is complete, spray the page with a light coat of matte workable fixative. This locks the graphite particles onto the paper fiber, preventing the artwork from smudging against the opposite page when the book is closed.
- Embrace the Contrast: Beginners are often terrified of going too dark. Don’t be. True hyper-realism lives within a wide dynamic range. If your shadows aren’t deeply dark, your highlights won’t pop. Trust your 6B and 8B pencils to do the heavy lifting.
6. Summary Checklist for Your Next Drawing
Before you wrap up your studio session, run through this quick quality control list to make sure your eye looks completely lifelike:
- [ ] Is the catchlight crisp and pure white?
- [ ] Did you shade the corners of the “white” of the eye to give it a round shape?
- [ ] Are the eyelashes curving in natural, overlapping clusters rather than straight lines?
- [ ] Is there a shadow cast by the upper eyelid cutting across the top of the iris?
- [ ] Did you leave the lower eyelid shelf light to suggest moisture?
With these foundational rules, techniques, and structural habits under your belt, you can confidently turn any blank page into a striking display of hyper-realistic art. Happy sketching!