Introduction
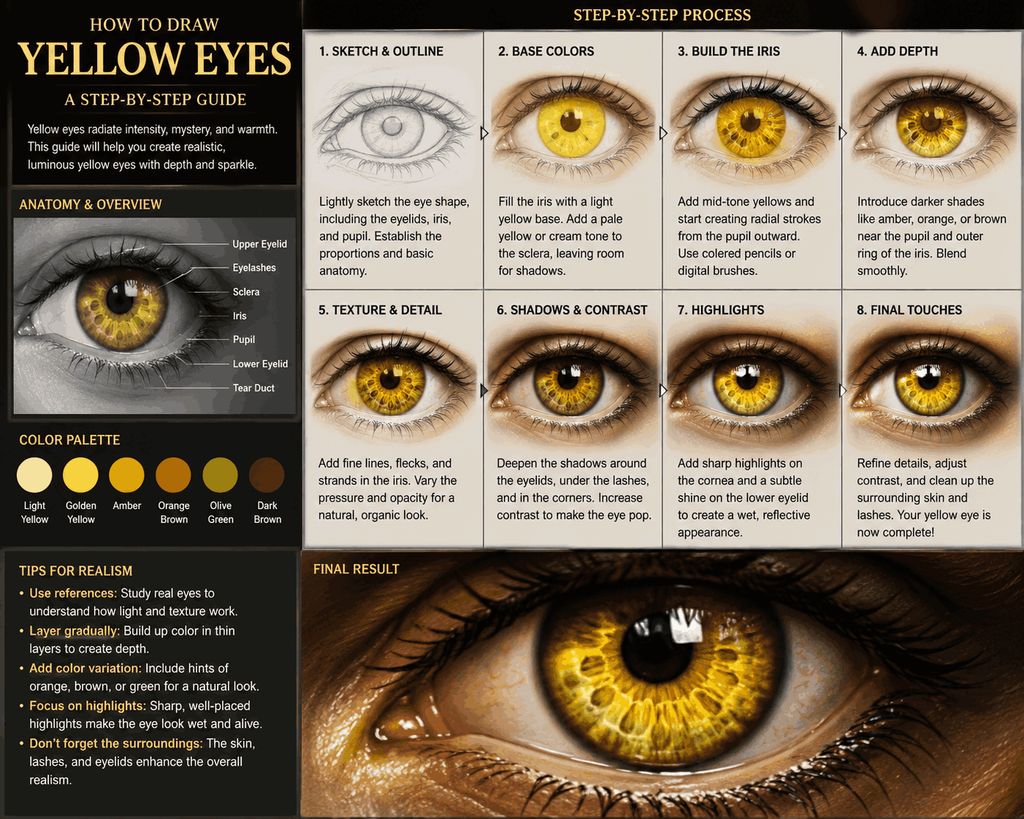
Capturing the intense glow, warmth, and striking depth of yellow eyes can elevate any portrait from ordinary to mesmerizing. Whether you are illustrating a fantasy creature, a dynamic anime character with amber irises, or a stylized portrait with golden tones, mastering yellow eyes requires an understanding of how light interacts with translucent layers and rich pigments.
Unlike standard brown or blue hues, yellow sits at the brighter end of the color spectrum, making it uniquely sensitive to highlights, deep shadows, and subtle undertones of orange and green.
This guide provides a comprehensive, step-by-step approach to help you render realistic yellow eyes from scratch. You will learn how to:
- Map out accurate proportions and anatomical landmarks of the eye.
- Layer colored pencils, paints, or digital brushes to create luminous golden tones.
- Render the delicate textures of the iris, pupil, and surrounding skin.
- Add high-contrast highlights that bring your drawing to life with a lifelike sparkle.
Grab your drawing tools, and let’s explore how to bring vibrant yellow eyes to your canvas with confidence and precision!
Essential Materials and Tools
Before diving into the step-by-step drawing process, it is vital to assemble the correct drawing instruments. The choice of medium will dictate your layering technique, blending smoothness, and highlight vibrancy.
- Drawing Surface: Smooth Bristol board (hot-pressed, 250gsm+) or heavy-weight mixed media paper to allow for seamless blending and crisp pencil details.
- Graphite Pencils: 2H pencil for light, accurate preliminary sketching; HB pencil for mid-tone construction.
- Colored Pencils: High-lightfast artist pencils (e.g., Faber-Castell Polychromos or Prismacolor Premier). Essential shades include Canary Yellow, Chrome Yellow, Burnt Ochre, Dark Sepia, Olive Green, and Permanent Red.
- Highlight Tools: A battery-operated electric eraser for pinpoint eraser marks and a white gel pen (such as Sakura Gelly Roll 10) for sharp specular highlights.
- Blending Instruments: Tortillons or blending stumps for soft skin transitions (avoid over-blending directly on detailed iris
- fibers).
Step 1: Anatomy and Accurate Proportions
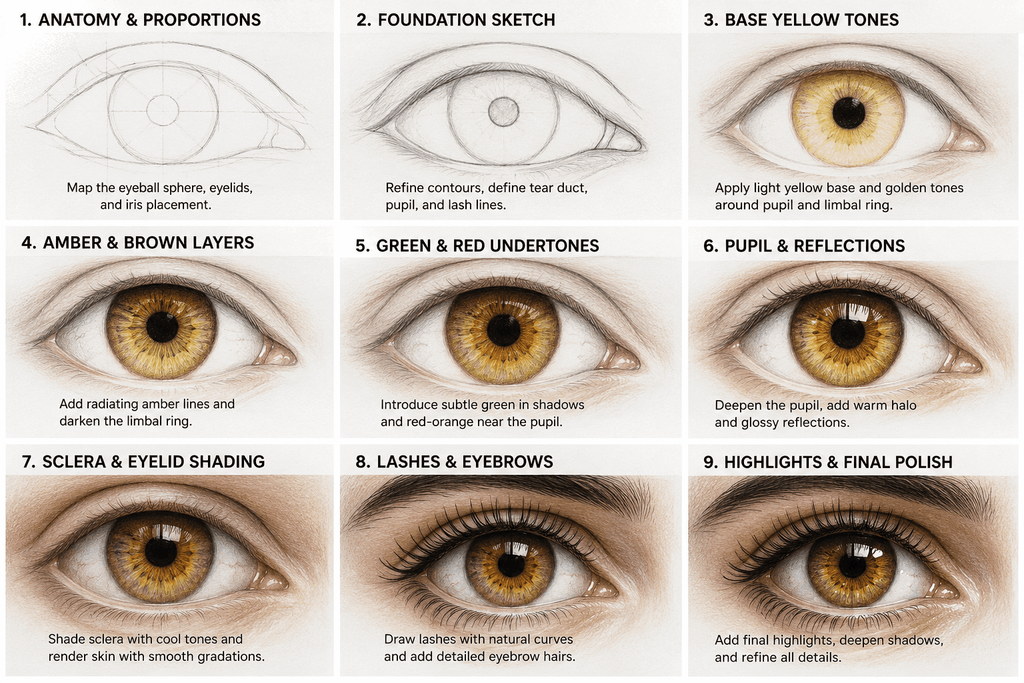
An eye is never a simple almond shape stamped onto a flat face; it is a spherical globe resting within a bony socket, wrapped by three-dimensional eyelids. Begin by lightly sketching the structural framework with your 2H pencil.
Start with a faint circle to represent the eyeball globe. Next, map out the upper and lower eyelids. Notice how the upper eyelid casts a natural shadow downward onto the upper portion of the eyeball and iris. Mark the placement of the circular iris, ensuring it is partially covered by the upper lid—fully exposed irises often look startled or unnatural in realistic portraiture.
Step 2: Establishing the Foundation and Core Sketch
Refine your contour lines with smooth, confident strokes. Locate the tear duct (caruncle) at the inner corner, observing its fleshy, pinkish-yellow morphology and wet highlight. Establish the thickness of the lash lines, noting that the upper eyelid has noticeable depth and skin folds that frame the eye.
Lightly sketch the pupil dead center (or slightly offset depending on the subject’s gaze). Gently erase stray construction lines, leaving a clean, precise outline ready for color and shading.
Step 3: Laying Down the Base Yellow Undertones
With your lightest yellow colored pencil (such as a soft lemon or canary yellow), apply an even, gentle base coat across the entire iris, avoiding the areas reserved for major highlights. Do not press too hard; you want to maintain tooth on the paper so subsequent layers can grip properly.
Once the base yellow is established, introduce warm golden ochre around the outer perimeter of the iris (the limbal ring) and immediately surrounding the pupil. This creates an immediate sense of warmth and dimension, separating the core light source from the shadowed boundaries.
Step 4: Building Depth with Amber and Brown Layers
Yellow eyes derive their realism from contrast. Without dark tones, yellow appears flat and neon. Using a sharpened burnt sienna or amber pencil, gently draw fine, radiating lines outward from the pupil toward the limbal ring. These are the trabeculae—the delicate muscle fibers that make up the iris pattern.
Layer dark sepia or burnt umber precisely around the outer edge of the iris to form a rich, smoky limbal ring. This dark border is crucial; it anchors the eyeball and gives it a glossy, three-dimensional dome effect rather than looking like a flat sticker.
Step 5: Introducing Unexpected Undertones (Green and Red)
One of the professional secrets to drawing hyper-realistic eyes is color variation. Pure yellow can sometimes look synthetic. By feathering tiny touches of olive green into the shadowed upper quadrants of the iris and hints of soft reddish-orange near the pupil, you simulate the natural scattering of light through organic pigments.
Keep these secondary colors subtle. They should peek through the yellow layers rather than dominate them, creating a rich, multifaceted amber appearance.
Step 6: Rendering the Glossy Pupil and Deep Reflections
The pupil must be the darkest part of the eye, but even a pure black pupil usually features internal reflections and soft light bouncing from the back of the chamber. Fill the pupil solidly with your darkest black pencil, but leave a tiny, soft indentation where ambient light wraps around the lower edge.
Surround the pupil with a warm, fiery orange-brown halo that bleeds outward into your primary yellow layers, establishing a glowing transition.
Step 7: Shading the Sclera and Eyelids
The white of the eye (sclera) is never pure white. It is a curved, wet sphere in shadow. Shade the upper corners of the sclera using cool gray, soft purple, or muted blue tones, since the upper eyelid creates an overarching shadow.
Render the skin surrounding the eye using smooth gradations. Build up the skin folds above the crease with warm grays, siennas, and flesh tones. Ensure the tear duct is rendered with soft pinks, wet white highlights, and warm yellow-orange undertones.
Step 8: Eyelashes, Eyebrows, and Fine Details
Eyelashes do not grow straight out like fence posts; they emerge from the follicle in sweeping, elegant curves, growing thicker at the base and tapering to razor-thin tips. Overlap some lashes so they cast delicate shadows onto the sclera and upper eyelid.
Draw fine hairs along the eyebrow, following the natural growth direction. Add subtle stray hairs to enhance realism.
Pro Tip: Vary the length and thickness of individual eyelashes. Clumping a few lashes together slightly adds an authentic, organic feel compared to uniformly spaced bristles.
Step 9: Adding Highlights and Final Polish
The final stage is where your drawing truly comes alive. Using your white gel pen or a sharp precision eraser, carve out the primary specular highlight (the reflection of the light source, usually a window or studio lamp) overlapping both the pupil and the dark edge of the iris.
Add a secondary, softer reflection on the opposite side of the iris to simulate ambient room light bouncing back. Deepen your darkest shadows one last time with a sharpened black pencil to maximize tonal contrast.
Conclusion: Bringing Your Masterpiece Together
Mastering realistic yellow eyes is a rewarding journey that combines anatomical precision with deliberate color layering. By moving step-by-step—from foundational blocking to rich amber textures, strategic color variations, and brilliant highlights—you transform simple pigments into a glowing, lifelike gaze.
Practice these techniques patiently on scrap paper before tackling your final portrait, and watch your artistic skills shine with absolute clarity!
FAQS
1. How do you draw realistic yellow eyes?
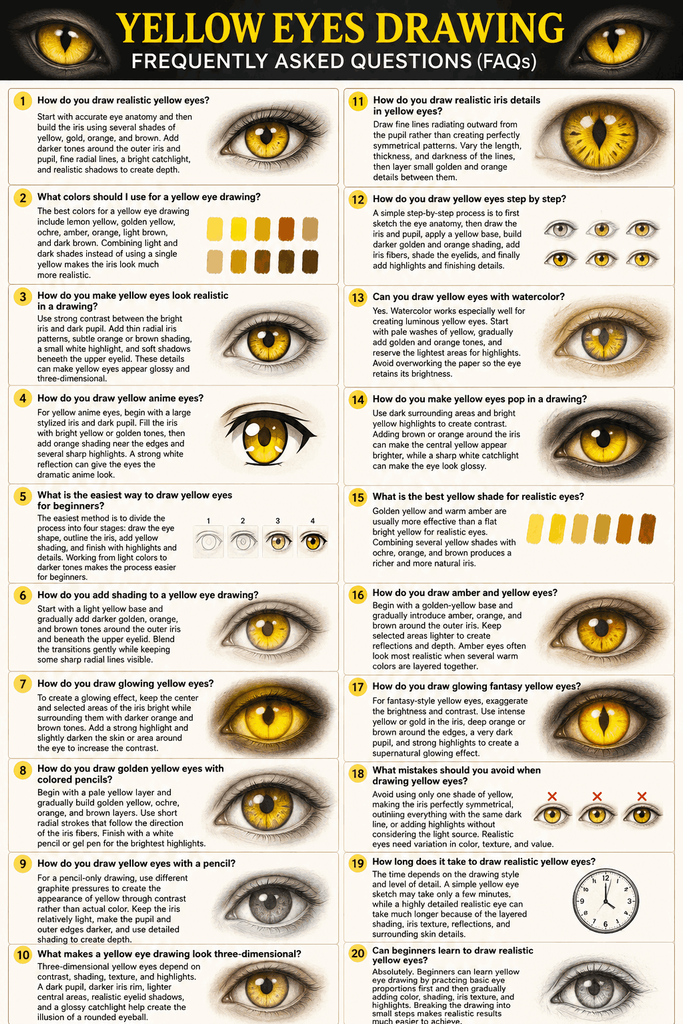
To draw realistic yellow eyes, start with accurate eye anatomy and then build the iris using several shades of yellow, gold, orange, and brown. Add darker tones around the outer iris and pupil, fine radial lines, a bright catchlight, and realistic shadows to create depth.
2. What colors should I use for a yellow eye drawing?
The best colors for a yellow eye drawing include lemon yellow, golden yellow, ochre, amber, orange, light brown, and dark brown. Combining light and dark shades instead of using a single yellow makes the iris look much more realistic.
3. How do you make yellow eyes look realistic in a drawing?
Use strong contrast between the bright iris and dark pupil. Add thin radial iris patterns, subtle orange or brown shading, a small white highlight, and soft shadows beneath the upper eyelid. These details can make yellow eyes appear glossy and three-dimensional.
4. How do you draw yellow anime eyes?
For yellow anime eyes, begin with a large stylized iris and dark pupil. Fill the iris with bright yellow or golden tones, then add orange shading near the edges and several sharp highlights. A strong white reflection can give the eyes the dramatic anime look.
5. What is the easiest way to draw yellow eyes for beginners?
The easiest method is to divide the process into four stages: draw the eye shape, outline the iris, add yellow shading, and finish with highlights and details. Working from light colors to darker tones makes the process easier for beginners.
6. How do you add shading to a yellow eye drawing?
Start with a light yellow base and gradually add darker golden, orange, and brown tones around the outer iris and beneath the upper eyelid. Blend the transitions gently while keeping some sharp radial lines visible.
7. How do you draw glowing yellow eyes?
To create a glowing effect, keep the center and selected areas of the iris bright while surrounding them with darker orange and brown tones. Add a strong highlight and slightly darken the skin or area around the eye to increase the contrast.
8. How do you draw golden yellow eyes with colored pencils?
Begin with a pale yellow layer and gradually build golden yellow, ochre, orange, and brown layers. Use short radial strokes that follow the direction of the iris fibers. Finish with a white pencil or gel pen for the brightest highlights.
9. How do you draw yellow eyes with a pencil?
For a pencil-only drawing, use different graphite pressures to create the appearance of yellow through contrast rather than actual color. Keep the iris relatively light, make the pupil and outer edges darker, and use detailed shading to create depth.
10. What makes a yellow eye drawing look three-dimensional?
Three-dimensional yellow eyes depend on contrast, shading, texture, and highlights. A dark pupil, darker iris rim, lighter central areas, realistic eyelid shadows, and a glossy catchlight help create the illusion of a rounded eyeball.
11. How do you draw realistic iris details in yellow eyes?
Draw fine lines radiating outward from the pupil rather than creating perfectly symmetrical patterns. Vary the length, thickness, and darkness of the lines, then layer small golden and orange details between them.
12. How do you draw yellow eyes step by step?
A simple step-by-step process is to first sketch the eye anatomy, then draw the iris and pupil, apply a yellow base, build darker golden and orange shading, add iris fibers, shade the eyelids, and finally add highlights and finishing details.
13. Can you draw yellow eyes with watercolor?
Yes. Watercolor works especially well for creating luminous yellow eyes. Start with pale washes of yellow, gradually add golden and orange tones, and reserve the lightest areas for highlights. Avoid overworking the paper so the eye retains its brightness.
14. How do you make yellow eyes pop in a drawing?
Use dark surrounding areas and bright yellow highlights to create contrast. Adding brown or orange around the iris can make the central yellow appear brighter, while a sharp white catchlight can make the eye look glossy.
15. What is the best yellow shade for realistic eyes?
Golden yellow and warm amber are usually more effective than a flat bright yellow for realistic eyes. Combining several yellow shades with ochre, orange, and brown produces a richer and more natural iris.
16. How do you draw amber and yellow eyes?
Begin with a golden-yellow base and gradually introduce amber, orange, and brown around the outer iris. Keep selected areas lighter to create reflections and depth. Amber eyes often look most realistic when several warm colors are layered together.
17. How do you draw glowing fantasy yellow eyes?
For fantasy-style yellow eyes, exaggerate the brightness and contrast. Use intense yellow or gold in the iris, deep orange or brown around the edges, a very dark pupil, and strong highlights to create a supernatural glowing effect.
18. What mistakes should you avoid when drawing yellow eyes?
Avoid using only one shade of yellow, making the iris perfectly symmetrical, outlining everything with the same dark line, or adding highlights without considering the light source. Realistic eyes need variation in color, texture, and value.
19. How long does it take to draw realistic yellow eyes?
The time depends on the drawing style and level of detail. A simple yellow eye sketch may take only a few minutes, while a highly detailed realistic eye can take much longer because of the layered shading, iris texture, reflections, and surrounding skin details.
20. Can beginners learn to draw realistic yellow eyes?
Absolutely. Beginners can learn yellow eye drawing by practicing basic eye proportions first and then gradually adding color, shading, iris texture, and highlights. Breaking the drawing into small steps makes realistic results much easier to achieve.