









Anime eyes are famous for being expressive, vibrant, and incredibly diverse. They don’t just capture a gaze; they tell a character’s entire story, emotion, and personality in a single glance. If you’ve ever wanted to jump into the world of manga art or master the “Tip Draw” style of sketching, learning how to construct these iconic features is the ultimate first step.
In this comprehensive guide, we will break down the anatomy of an anime eye, explore the crucial role of light and shadow, and give you an actionable, step-by-step framework to sketch flawless anime eyes every time.
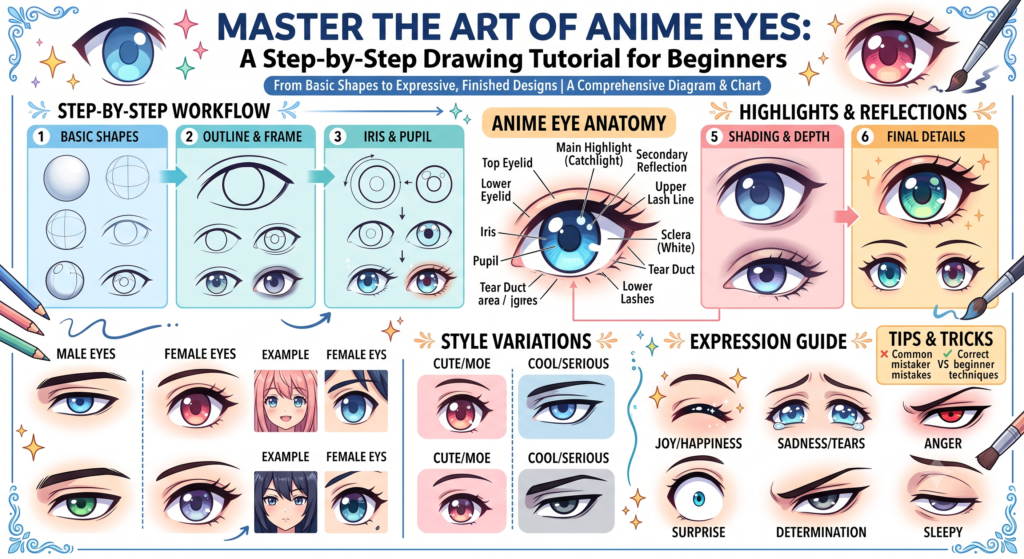
1. The Anatomy of an Anime Eye
Unlike realistic eyes, which strictly follow the physical boundaries of human anatomy, anime eyes are highly stylized and exaggerated. However, the most striking anime eyes still rely on a solid foundation of structure, proportion, and balance. Understanding these core components ensures your drawings look deliberate and polished rather than accidental.
Core Components to Remember
- The Upper Lash Line: This is typically the thickest, darkest, and most defined line in the drawing. It defines the overall shape of the eye (e.g., round, sharp, droopy) and establishes the character’s mood.
- The Lower Lash Line: A thinner, more subtle line that framing the bottom of the eye. In many anime styles, this line is detached from the upper lash line to create an open, youthful look.
- The Iris: The colorful, central hub of the eye. While realistic irises are circular, anime irises are frequently drawn as elongated ovals, tall rectangles, or even soft shields.
- The Pupil: The dark center of the iris. In anime, the pupil can stretch, change shape (like a star or diamond), or blend entirely into the top shadow of the eye.
- Highlights (Catchlights): The magical element of anime art. These white reflections indicate the light source and inject life, energy, and emotion into your character.
2. Setting Up Your Canvas: Shape and Emotion
Before you put pencil to paper (or stylus to tablet), you need to decide what kind of character you are creating. The shape of the eye acts as an immediate visual shorthand for the audience.
| Eye Shape | Character Archetype | Emotional Vibe |
| Large & Perfectly Round | Protagonists, Magical Girls, Innocent Types | Wonder, Joy, Vulnerability |
| Sharp & Narrow | Rivals, Anti-Heroes, Mature Characters | Determination, Mystery, Coolness |
| Droopy & Downward Slanting | Gentle Companions, Shy or Tired Characters | Kindness, Melancholy, Softness |
3. Step-by-Step Tutorial: Drawing a Classic Anime Eye
Let’s walk through the exact process of sketching a classic, highly expressive anime eye. Keep your lines light during the initial stages so you can easily adjust your proportions.
Step 1: The Foundation Arch (Upper Lash Line)
Start by drawing a bold, curved stroke for the upper lash line. If you are aiming for a classic look, make the arch peak slightly past the center toward the outer edge. Give the outer corner a slight flick or a defined eyelash point to add flair and weight.
Step 2: Framing the Bottom (Lower Lash Line)
Directly beneath your upper arch, sketch a shorter, flatter curve for the lower lash line. Leave a noticeable gap between the inner and outer corners where the upper and lower lines meet. Keeping these lines disconnected is a classic technique that makes the eye appear larger and more expressive.
Step 3: Placing the Iris
Draw a tall, vertical oval spanning between the upper and lower lash lines. The top of the oval should be slightly tucked under the upper lash line—this prevents the character from looking startled or wild. Ensure there is a perfect balance of space on the left and right sides of the iris.
Step 4: Mapping the Highlights and Pupil
Before adding any dark tones, map out your highlights. Place a large, circular highlight near the top-left or top-right corner (depending on your light source). You can add a secondary, smaller highlight diagonally opposite to give the eye a sparkling, three-dimensional look. Once the highlights are mapped, sketch the pupil right in the center, partially behind the main highlight.
4. Master the Art of Value, Shading, and Depth
Shading is where your drawing transitions from a simple flat sketch into a breathtaking piece of art. By mastering the anatomy of light and shadow within the iris, you can create the illusion of glowing, glass-like depth.
[Top of Iris: Deep, Dark Shadow]
       │
       ▼
[Mid-Iris: Smooth Gradient Transition]
       │
       ▼
[Bottom of Iris: Bright Reflected Light]
The Gradient Technique
- The Dark Drop Shadow: Treat the upper eyelid as an awning that casts a shadow downward. Shade the top third of the iris with a deep, dark value. This shadow should completely engulf the top of the pupil.
- The Smooth Transition: Softly blend your shading downward from the dark upper area, gradually lightening the pressure of your pencil as you approach the bottom of the iris.
- The Reflected Light Pocket: Leave the absolute bottom of the iris incredibly light. This creates a stunning contrast against the dark top shadow, making the eye look like it is catching and refracting ambient light.
5. Adding the Finishing Touches and Micro-Details
To truly capture your audience’s attention and maximize your artistic impressions, you need to focus on the minor details that elevate a drawing from good to professional.
- The Eyelid Fold: Sketch a thin, delicate line just a few millimeters above the upper lash line. This single detail instantly adds structural realism and depth to the eye socket.
- Expressive Eyebrows: An eye is only as expressive as the brow above it. Position the eyebrow relatively close to the upper lash line for an intense, focused look, or arch it high to convey surprise and innocence.
- The Sclera Shadow: Don’t leave the white of the eye perfectly blank. Use a soft grey tone or light blue tint to shade the very top of the eyeball directly beneath the upper lash line. This subtle touch anchors the iris perfectly inside the socket.
6. Common Mistakes to Avoid
Even experienced artists can trip up on the unique proportions of anime art. Keep these common pitfalls in mind as you practice:
- Floating Irises: If the iris is a perfect circle floating right in the middle without touching the top eyelid, your character will constantly look terrified. Ensure the top edge is slightly hidden.
- Overcomplicating Highlights: While sparkles look beautiful, adding too many white dots can make the eye look cluttered and chaotic. Stick to one dominant highlight and one or two tiny secondary accents.
- Mismatched Symmetry: When drawing a pair of eyes, always remember that the highlights must face the same direction (e.g., both on the top-left of each eye), because the light source illuminating the character is the same. Mirroring the highlights will make the character look cross-eyed.
Pro-Tips for Rapid Improvement
The secret to mastering eye drawing is focused, intentional practice. Dedicate a page in your sketchbook entirely to experimenting with different upper lash curves, adjusting pupil sizes, and playing with dramatic shading gradients. By practicing these techniques individually, you will build the muscle memory required to sketch breathtaking anime eyes effortlessly. Keep refining your lines, experiment with unique styles, and enjoy the creative journey!




One comment on “Master the Art of Anime Eyes: A Step-by-Step Drawing Tutorial for Beginners”