Drawing a human eye can feel incredibly intimidating. When you look at a realistic portrait, the eyes seem to hold an overwhelming amount of detail—from the wet reflection of the highlight to the intricate fibers inside the iris. It is easy to think, “I need years of art school to pull that off.”
But here is the secret: drawing a beautiful, realistic eye is not about mastering advanced artistic sorcery. It is simply about breaking a complex object down into basic shapes and adding layers systematically.
Whether you are an absolute beginner picking up a graphite pencil for the first time or a hobbyist trying to improve your sketching tips, this guide will show you how to draw eyes easy without the stress.
Let’s grab our sketching books, sharpen our pencils, and walk through the process together.
Choosing Your Drawing Materials
Before we draw our first line, let’s make sure you have the right tools on your desk. You do not need expensive, professional-grade supplies to get great results, but using the right grade of pencil makes shading significantly easier.
- Pencils: Use a standard 2B pencil for mapping out the initial guidelines. For deep shadows (like the pupil and upper lash line), use a softer 4B or 6B pencil.
- Paper: A smooth sketchbook or drawing paper works best. Avoid heavily textured paper when you are starting out, as it makes smooth skin shading difficult.
- Eraser: A standard plastic eraser works fine, but a kneaded eraser is your best friend for tapping highlights back into dark shaded areas.
- Blending Tool: You can use a paper blending stump (tortillon), a cotton swab, or even a soft tissue to smoothly blend out your pencil strokes.
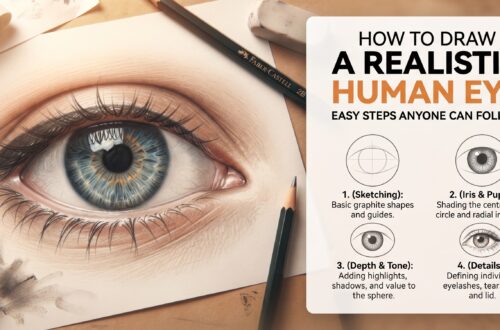
Step 1: Laying Down the Basic Shapes
The biggest mistake beginners make is trying to draw the final shape of the eye immediately. Instead, we want to look at the eye as a collection of simple geometric lines.
First, lightly sketch a circle. This represents the actual eyeball structure underneath the skin.
Next, draw a straight horizontal line right through the center of the circle, extending slightly past both sides. This line will act as a level anchor to ensure your eye corners align properly and do not look skewed.
      _______
    /         \
   /   |   |   \
  |----*---*----|  <-- Central Anchor Line
   \   |   |   /
    \_________/
Step 2: Mapping the Outer Eye Outline
Now, we will sketch the actual openings of the eyelids over our circle framework. Think of the upper eyelid as an asymmetrical arch.
Start at the inner corner (near the nose), curve the line upward sharply, peak about two-thirds of the way across, and then angle it down toward the outer corner. The outer corner should rest slightly higher than the inner corner on your central anchor line.
For the lower eyelid, sketch a shallower, gentler curve. It should loop downward slightly and meet the outer corner smoothly. Keep these lines incredibly light so you can erase your original circular framework later without leaving dark indentations on your paper.
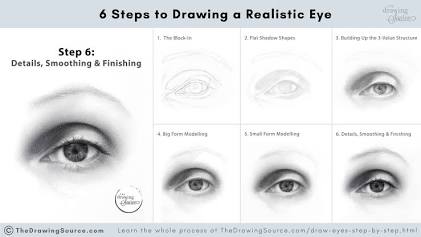
Step 3: Positioning the Iris and Pupil
The iris is the colored circular portion of the eye, and the pupil is the dark center. A common error is drawing the iris as a floating, complete circle right in the middle of the eye. In a natural, resting gaze, the top of the iris is always partially covered by the upper eyelid.
- Sketch the Iris: Draw a large circle inside the eyelid boundaries. Ensure the top curve disappears slightly underneath the top eyelid line.
- Locate the Pupil: Find the absolute center of your iris circle and draw a smaller, dark circle.
- Protect the Highlight: Before you shade anything, sketch a tiny circle or square overlapping the edge of the pupil and the iris. This is your primary light reflection (highlight). Leave this spot completely white throughout the entire drawing process to give the eye a wet, lifelike appearance.
Step 4: Adding Key Structural Anatomy
To elevate your sketch from a flat cartoon to a realistic eye drawing, you need to include two vital structural elements: the tear duct and the eyelid creases.
The Tear Duct (Caruncle)
On the inner corner of the eye, extend your lines out into a small, soft triangular shape. This represents the tear duct. It breaks up the perfect football shape that beginners often draw and immediately anchors the eye realistically onto the face.
The Eyelid Creases
The eye sits inside a recessed socket, covered by folds of skin. Mimic this by drawing a soft, curved line running parallel just above your upper eyelid line. This single line defines the upper eyelid crease. Additionally, sketch a shorter, fainter crease line below the bottom eyelid to suggest the lower lid structure.
Step 5: Master the Art of Shading the Eye
Shading is where your flat line drawing transforms into a 3D masterpiece. We will work in layers, gradually building up values from light grey to rich, dark black.
[Base Layer] --> [Iris Fibers] --> [Deep Shadows] --> [Blend & Contrast]
1. Shading the Eyeball (Sclera)
The white of the eye is never actually pure white. Because it is a sphere, shadows wrap around its edges. Take your blending stump or a light pencil tone and softly shade the outer corners of the eyeball, fading into pure white as you approach the iris. This gives the eyeball its round volume.
2. Shading the Iris
Fill in the pupil completely with a dark 4B or 6B pencil, making sure to avoid your highlight circle. Next, draw a dark border around the entire outside rim of the iris.
From that dark outer rim, draw thin, radiating lines pointing inward toward the pupil, resembling the spokes of a bicycle wheel. Leave some areas between the spokes slightly lighter to capture the natural depth of the iris fibers.
3. Creating the Upper Eyelid Shadow
Because the upper eyelid casts a physical shadow downward over the eyeball, draw a soft, dark horizontal shadow line directly underneath the upper eyelid arch. This shadow should cut cleanly across both the white of the eye and the top portion of the iris. Without this shadow, the eye will look like it is unnaturally bulging out.
Step 6: Drawing Realistic Eyelashes Easy
Many artists dread drawing eyelashes because they try to draw them as straight, rigid vertical lines. This creates a spiked comb effect. Real eyelashes grow in clusters, curve outward, and vary dramatically in length.
- The Upper Lashes: Start your pencil stroke right at the eyelid line, press down firmly, and flick your wrist upward and outward in a quick “J” curve. Lashes near the outer corner curve toward the ear; lashes near the center flick upward; lashes near the tear duct point slightly toward the nose.
- The Lower Lashes: Lower lashes are significantly shorter, thinner, and sparser than upper lashes. Group them into tiny clusters of two or three hairs that meet at the tips, leaving distinct spaces between the groupings.
- The Lash Root Rule: Never draw lashes coming directly out of the eyeball itself. Always leave a tiny, light gap along the lower lid rim to represent the wet shelf of the eyelid where the lashes naturally root.
Quick Reference: Pro Beginner Checklist
To make sure your drawing stays on track, keep these essential rules in mind as you work through the steps:
| Structural Feature | Key Target to Check | Why it Matters |
| Iris Placement | Partially tucked under the top lid | Prevents a shocked or staring expression |
| Eyeball Shading | Softer dark tones in the outer corners | Turns a flat shape into a 3D sphere |
| Primary Highlight | Kept pure white, crossing pupil/iris | Gives the eye life and realistic moisture |
| Lash Direction | Sweeping “J” curves flicked outward | Avoids rigid, unnatural “spiky comb” lines |
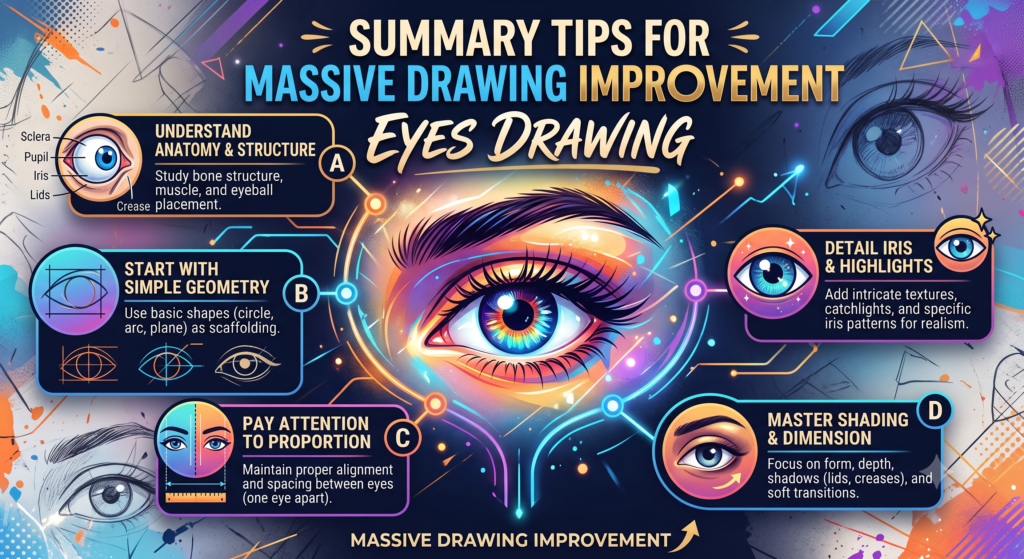
Summary Tips for Massive Drawing Improvement
As you practice how to draw eyes easy, keep these final three rules in mind to fast-track your progress:
Avoid Harsh Outlines: In real life, human faces don’t have bold black outlines surrounding every feature. Use soft shading boundaries instead of hard, dark drawn lines to separate the skin from the eyeball.
Embrace High Contrast: Do not be afraid to press down hard with your 6B pencil on the pupil and the deep crease of the upper eyelid. High contrast between your deepest blacks and your brightest white highlights is what makes a sketch pop off the page.
Practice Asymmetry: Every eye shape is beautifully unique. Avoid trying to make eyes perfectly symmetrical or uniform. Focus on observing the specific curves of your subject.
Learning how to draw eyes easy is a matter of patience, observation, and layers. Don’t worry if your very first sketch doesn’t look completely flawless. Keep practicing the basic framework, trust the layering process, and watch your sketches rapidly transform!